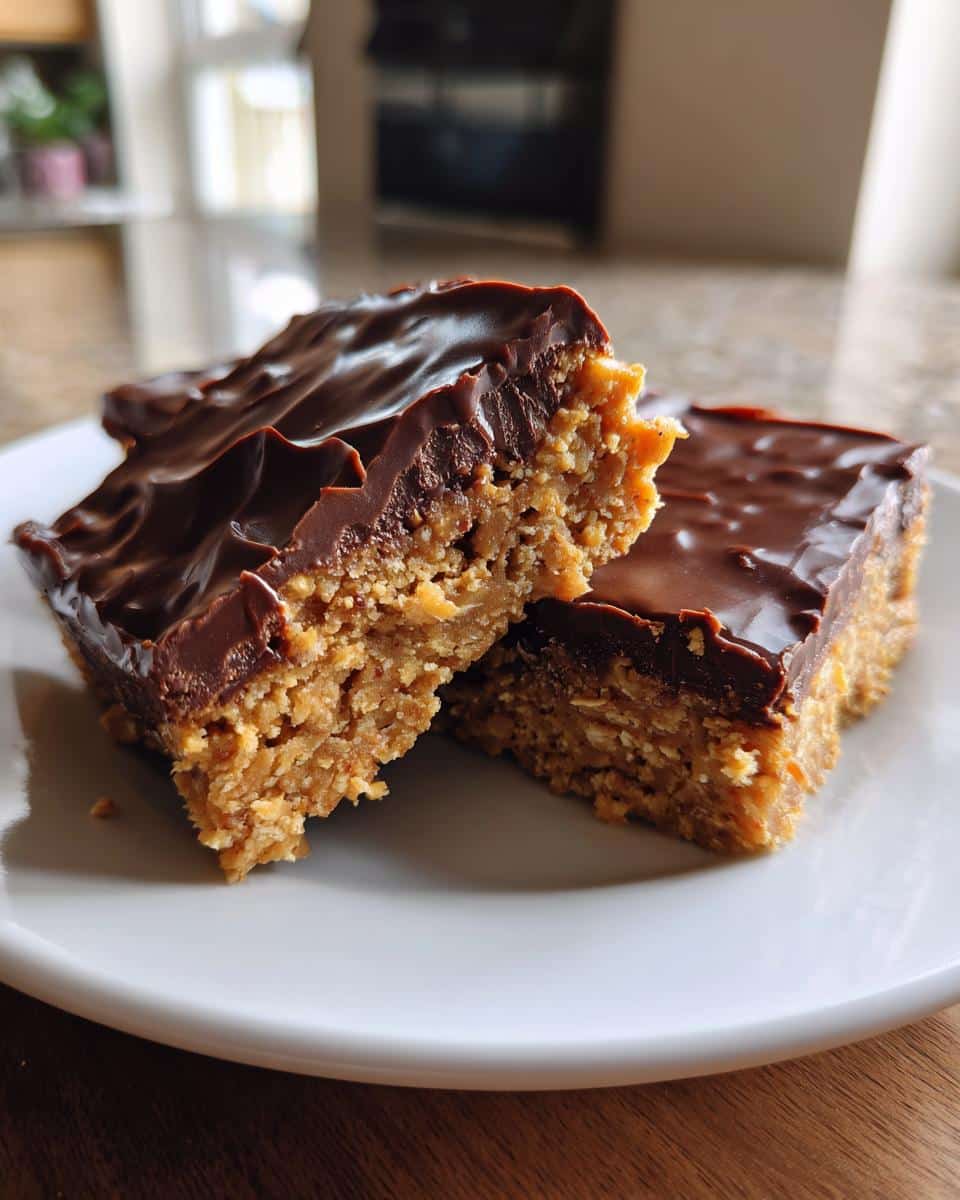
Oh my gosh, you have to try these no-bake chocolate peanut butter bars. They’re my go-to when I need something sweet in a hurry—no oven, no fuss, just pure deliciousness. Picture this: a creamy peanut butter base with just the right amount of chew from the oats, all topped with a smooth layer of melted chocolate. It’s like magic how five simple ingredients come together in minutes. Don’t even get me started on the taste—it’s rich, a little salty, a little sweet, and 100% addictive. Trust me, once you make these, they’ll disappear faster than you can say “peanut butter”
Table of Contents
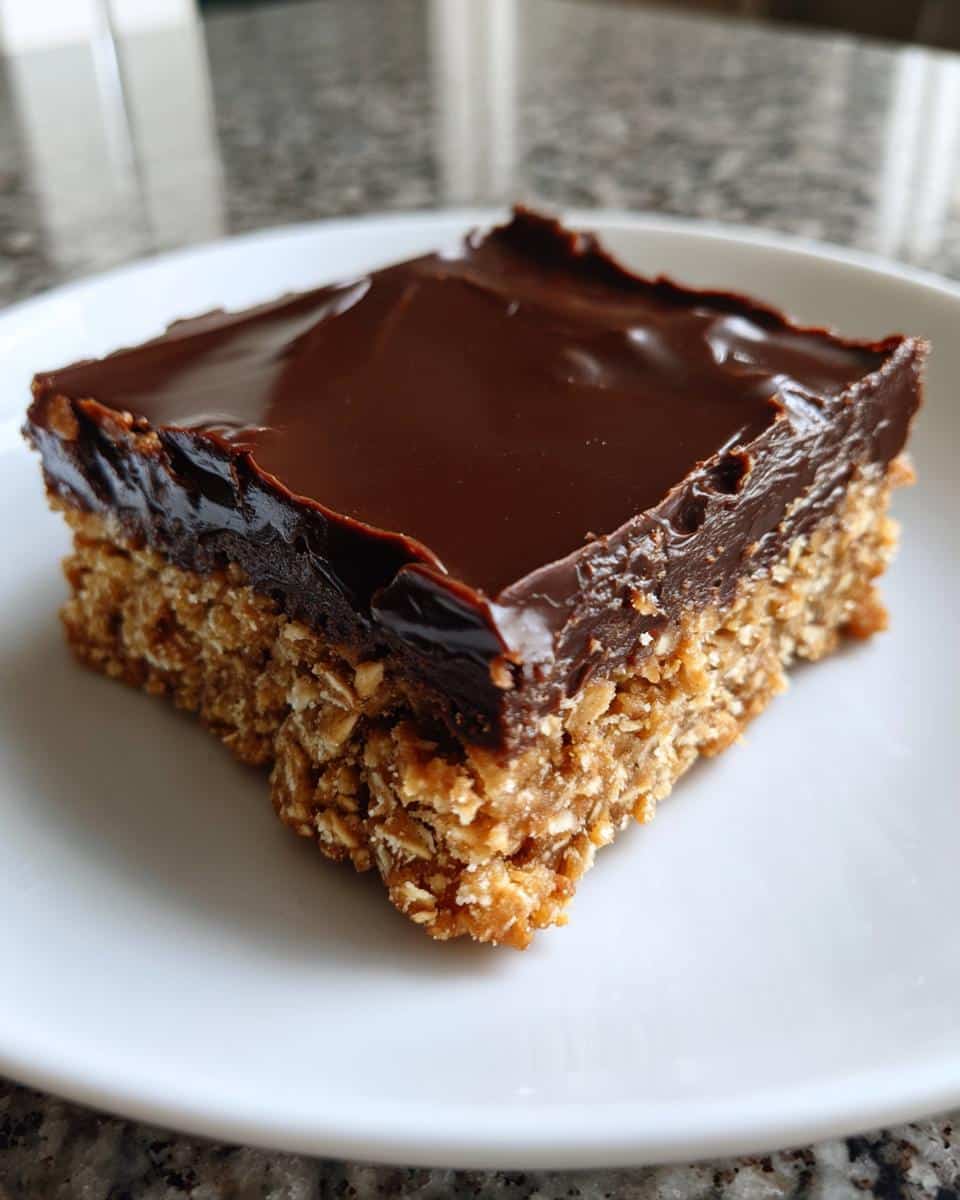
Why You’ll Love These No-Bake Chocolate Peanut Butter Bars
These bars are honestly too good to be true—and yet, here they are. Let me count the ways you’ll become obsessed:
- Speed demon: Done in 10 minutes flat (plus chilling). No waiting for ovens to preheat or batches to bake.
- Heatwave-proof: Summer cravings? No problem. Your kitchen stays cool while you satisfy that chocolate-peanut butter itch.
- Pantry superhero: Five basic ingredients you probably already have—no fancy grocery runs required.
- Crowd pleaser: Kids, adults, that picky neighbor who never likes anything? They’ll all beg for the recipe.
- Texture heaven: Chewy oats, creamy PB, and that crisp chocolate shell create the most addictive bite.
Seriously, these bars solve every dessert emergency life throws at you.
Ingredients for No-Bake Chocolate Peanut Butter Bars
Okay, let’s talk ingredients—simple, classic, and oh-so-perfect. Here’s what you’ll need to make these dreamy bars:
- 1 cup creamy peanut butter: Go for the natural kind if you can. It’s got that pure peanut flavor and none of the weird additives. Trust me, it makes a difference.
- 1/2 cup honey: Sweet, sticky, and just the right amount to hold everything together. Maple syrup works too if you’re in a pinch.
- 1/2 cup melted coconut oil: This is the secret to that smooth, melt-in-your-mouth texture. Plus, it’s got a subtle tropical vibe that pairs so well with the peanut butter.
- 2 cups rolled oats: Old-fashioned oats are my go-to here. They give the bars that perfect chew without being too dense.
- 1 cup semi-sweet chocolate chips: Because what’s a peanut butter bar without a chocolate topping? Semi-sweet is my favorite—it’s rich but not overly sweet.
That’s it. Five ingredients, zero stress, and a whole lot of yum. You’re gonna love how easy this is.
How to Make No-Bake Chocolate Peanut Butter Bars
Alright, let’s get to the fun part—making these dreamy bars. I promise it’s so easy you’ll laugh. Just follow these simple steps, and you’ll have a tray of chocolate-peanut butter heaven in no time.
Step 1: Prepare the Base
First things first—grab a big mixing bowl and dump in that peanut butter, honey, and melted coconut oil. Now, here’s my little trick: warm the honey slightly if it’s too thick. It blends like a dream when it’s a bit runny. Stir everything together until it’s smooth and glossy—you’ll know it’s ready when it looks like liquid gold.
Next, toss in those rolled oats. I like to fold them in gently at first, then get in there with some muscle to make sure every last oat gets coated in that peanut butter goodness. The mixture should hold together when you press it between your fingers—if it’s too crumbly, add a tiny bit more honey or peanut butter.
Step 2: Press and Chill
Line your 8×8 baking dish with parchment paper—trust me, this step saves so much hassle later. Now dump that oat mixture in and press it down firmly with your hands or the back of a spoon. Really pack it in there. You want a nice, even layer that holds its shape when you cut it later.
Pop this into the fridge for about 15 minutes while you work on the chocolate. This quick chill helps the base firm up just enough so the chocolate layer spreads beautifully without mixing into the peanut butter layer. (Learned that the hard way after my first batch turned into a marbled mess—oops)
Step 3: Add Chocolate Layer
Time for the best part—the chocolate. Melt those chocolate chips gently in the microwave (30-second bursts, stirring in between) or use a double boiler if you’re feeling fancy. When it’s smooth and pourable, spread it evenly over the chilled peanut butter base. I like to tilt the pan to help the chocolate reach every corner.
Now comes the hardest part—waiting. Slide the whole tray back into the fridge for at least 2 hours. I know, I know—the temptation to sneak a taste is real. But letting it set completely means you’ll get those perfect clean slices when you cut them. Worth the wait, I promise.
Tips for Perfect No-Bake Chocolate Peanut Butter Bars
After making these bars approximately a zillion times (okay, maybe just dozens), I’ve picked up some foolproof tricks to guarantee perfect results every single time. These little hacks are game-changers.
Parchment paper is your best friend: That moment when you try to lift out bars without lining the pan? Disaster. A parchment paper sling with overhanging edges lets you lift the whole batch out effortlessly. Bonus: zero scraping or broken corners.
Room temp peanut butter blends smoother: Cold peanut butter straight from the fridge fights you when mixing. Let it sit out for 20 minutes first—it combines beautifully with the honey and coconut oil without leaving stubborn lumps.
Chill thoroughly before slicing: I know patience is hard when chocolate’s involved, but trust me—wait those full 2 hours. Cutting too soon makes messy edges. For super-clean slices, run your knife under hot water between cuts.
Press FIRMLY: When packing the oat mixture into the pan, really lean into it. Compact layers hold together better when biting into them later. I sometimes use a flat-bottomed glass to get extra pressure.
Ingredient Substitutions and Notes
Listen, I know life happens—maybe you’re out of honey or your kid’s best friend has a peanut allergy. No worries. These bars are crazy flexible. Here are all my tried-and-true swaps that still deliver amazing results:
Sweetener swap: Ran out of honey? Maple syrup works beautifully—just use the same amount. Agave nectar or even brown rice syrup will do in a pinch, though the flavor will be slightly different. If you’re cutting sugar, you can try monk fruit syrup, but you might need to reduce the amount since it’s sweeter.
Nut butter alternatives: Almond butter makes a fantastic substitute if peanuts aren’t your thing. Cashew butter gives a milder flavor, while sunflower seed butter keeps it nut-free for school lunches. Just make sure whatever you use is creamy, not chunky, for that smooth texture we love.
Oat options: Need gluten-free? Certified gluten-free rolled oats work exactly the same way. In a real pinch, you could use quick oats (they’ll be slightly softer) or even crushed gluten-free cereal like Chex. Pro tip: toast the oats first for an extra-nutty flavor.
Coconut oil replacement: If coconut oil isn’t your jam, melted butter works great (though they won’t be dairy-free anymore). For a neutral taste, refined coconut oil or even vegetable shortening will do—just avoid olive oil unless you want that distinct flavor coming through.
Chocolate variations: Semi-sweet chips are my go-to, but dark chocolate makes them more sophisticated, while milk chocolate satisfies serious sweet tooths. White chocolate chips with a sprinkle of sea salt? Don’t mind if I do. You could even use chopped chocolate bars if that’s what you’ve got.
The beauty of these bars? They’re practically impossible to mess up. Just keep the ratios roughly the same, and you’ll have something delicious every single time. Now go raid that pantry—I bet you can make a batch right now with what you’ve got.
Serving and Storing No-Bake Chocolate Peanut Butter Bars
Okay, the hardest part is over—now let’s talk about enjoying your masterpiece. First things first: cutting. I like to score the chocolate layer lightly with a knife before it’s fully set (about 30 minutes into chilling). When it’s completely firm, follow those lines to get 12 perfect little squares. Pro tip: run your knife under hot water and dry it between cuts for those gorgeous clean edges that’ll make you feel like a pastry chef.
These bars are dreamy straight from the fridge—the chocolate has that satisfying snap when you bite in, and the peanut butter layer stays firm but creamy. But here’s my favorite trick—let one sit out for 5 minutes before eating. That little bit of warmth makes the flavors bloom and the texture turns almost fudge-like. Absolute heaven with a cold glass of milk.
As for storage? Easy peasy. Just pop them in an airtight container with parchment between layers (so they don’t stick together) and keep them refrigerated. They’ll stay perfect for up to a week—though let’s be real, they’ll probably disappear in two days. For longer storage, freeze them on a baking sheet first (so they don’t freeze together), then transfer to a freezer bag. They’ll keep for 3 months frozen, and honestly taste amazing straight from the freezer—like peanut butter chocolate ice cream bars without the melt factor.
One last serving idea—these make killer ice cream sandwiches. Let two bars soften slightly, then sandwich a scoop of vanilla ice cream between them. Roll the edges in crushed peanuts for extra crunch. You’re welcome.
Nutritional Information
Alright, let’s talk numbers—because I know some of you love tracking this stuff (and others just want to know how fast to run to burn off that second bar). Here’s the scoop on what’s in these dreamy no-bake chocolate peanut butter bars. Just remember, these are estimates—your exact counts might vary depending on your specific ingredients.
Per bar (assuming you cut them into 12 glorious squares):
- 220 calories – Perfect for when you need that afternoon pick-me-up without going overboard
- 14g fat – Mostly the good kind from peanut butter and coconut oil (but yeah, some from that irresistible chocolate too)
- 20g carbs – From the honey and oats, giving you that quick energy boost
- 5g protein – Thanks to our star ingredient, peanut butter. Not bad for a dessert, right?
- 2g fiber – Those oats are working overtime to keep things moving
- 12g sugar – A mix of natural sugars from honey and a touch from the chocolate
Now, here’s my two cents—these aren’t “health food,” but they’re made with real ingredients you can pronounce. No weird chemicals or processed junk. And compared to store-bought candy bars? Way less sugar, way more satisfaction. I call that a win.
P.S. If you’re counting macros or have special dietary needs, definitely calculate based on your exact ingredients. My numbers are based on using natural peanut butter, regular honey, and semi-sweet chocolate chips. Your mileage may vary.
FAQs About No-Bake Chocolate Peanut Butter Bars
Can I freeze these bars?
Absolutely, These freeze like a dream. Just pop them on a baking sheet first (so they don’t stick together), then transfer to a freezer bag once solid. They’ll keep for up to 3 months—though mine never last that long. Pro tip: eat one straight from the freezer for a frozen peanut butter cup experience.
Are these gluten-free?
They sure can be. Just use certified gluten-free oats. I’ve made them this way for my celiac friends, and they couldn’t tell the difference. Watch out for cross-contamination if that’s a concern—some peanut butters are processed in facilities with wheat products.
Why did my chocolate layer crack when I cut it?
Oh honey, I’ve been there. This usually happens if the chocolate gets too cold too fast. Next time, try letting the melted chocolate cool slightly before spreading—just until it thickens a bit but still pours. And don’t refrigerate immediately; let it sit at room temp for 10 minutes first. Works like magic.
Can I use crunchy peanut butter instead?
You totally can if you love that extra texture. Just know the bars won’t have that smooth, creamy mouthfeel. I sometimes mix half creamy and half crunchy for the best of both worlds. Bonus: sprinkle chopped peanuts on the chocolate layer before it sets for extra crunch.
Help! My mixture seems too dry—what now?
No panic. Just add a teaspoon more melted coconut oil or peanut butter until it holds together when pressed. Different brands of peanut butter vary in oil content. My rule? If you can form a ball that sticks together without crumbling, you’re golden. Too wet? Add a handful more oats.
Follow us on Facebook for more delicious recipes.
Find more easy morning ideas in our web site.
Print5-Minute No-Bake Chocolate Peanut Butter Bars –
Easy no-bake chocolate peanut butter bars with a rich, creamy texture.
- Prep Time: 10 minutes
- Cook Time: 0 minutes
- Total Time: 2 hours 10 minutes
- Yield: 12 bars
- Category: Dessert
- Method: No-Bake
- Cuisine: American
- Diet: Vegetarian
Ingredients
- 1 cup peanut butter
- 1/2 cup honey
- 1/2 cup coconut oil
- 2 cups rolled oats
- 1 cup chocolate chips
Instructions
- Mix peanut butter, honey, and coconut oil in a bowl.
- Stir in rolled oats until combined.
- Press mixture into a lined baking dish.
- Melt chocolate chips and spread over the top.
- Chill for 2 hours before slicing.
Notes
- Store in the fridge for up to a week.
- Use natural peanut butter for best results.

