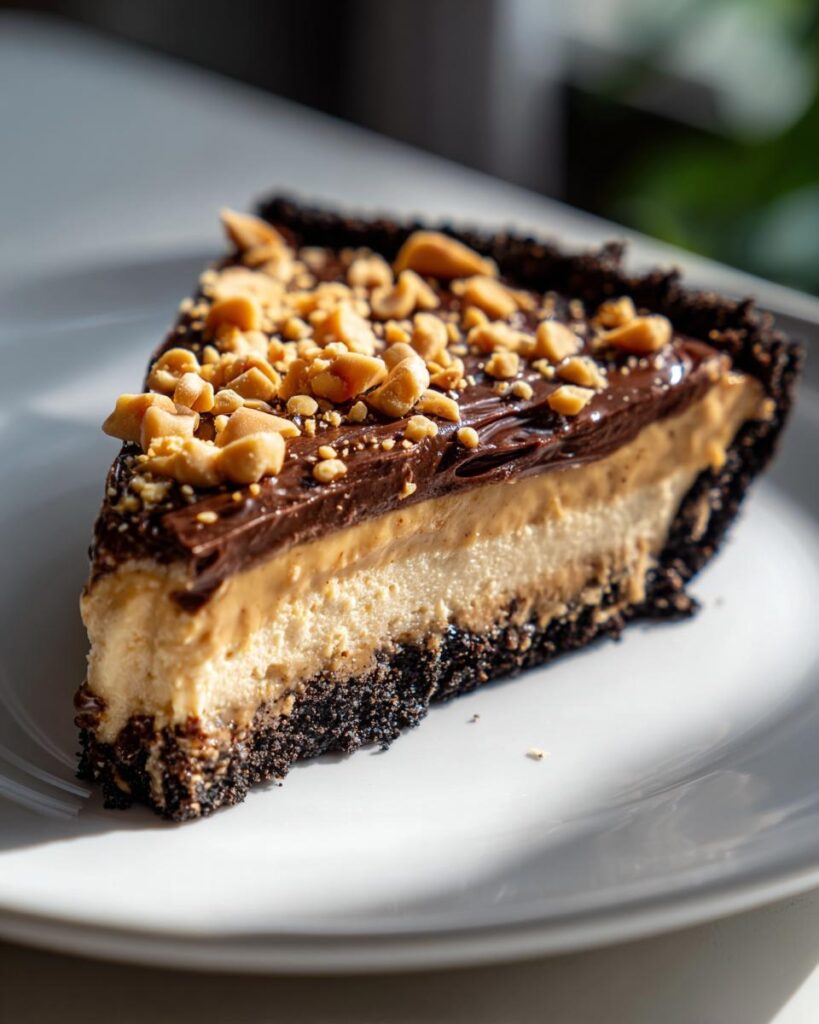
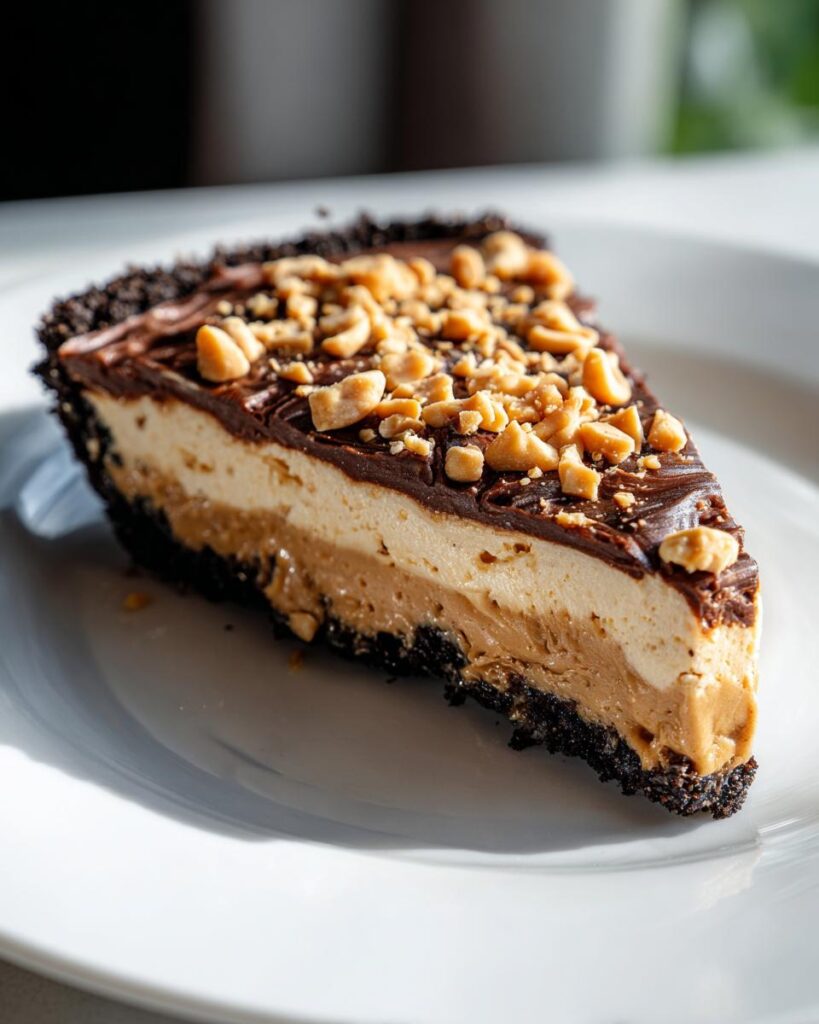
I’ll never forget the first time I made this no-bake peanut butter pie for my cousin’s birthday—it was a sweltering summer day, and turning on the oven felt like a crime. This pie saved the party. Creamy, dreamy, and packed with peanut butter goodness, it’s the kind of dessert that disappears before you can even snap a photo. The best part? No oven, no fuss—just 20 minutes of mixing and a few hours of patience (okay, maybe less if you sneak a spoonful of filling). Trust me, once you try this no-bake peanut butter pie, you’ll understand why it’s my go-to for every potluck, picnic, or “I need chocolate and peanut butter NOW” moment.
Table of Contents
Why You’ll Love This No-Bake Peanut Butter Pie
- It’s ready in just 20 minutes—no baking required.
- The creamy peanut butter filling is pure heaven.
- Perfect for hot days when you don’t want to turn on the oven.
- Customize it with your favorite toppings—chopped peanuts, chocolate drizzle, or whipped cream.
- It’s a crowd-pleaser that’s as easy to make as it is delicious.
Ingredients for No-Bake Peanut Butter Pie
Gather these simple ingredients—you probably have most in your pantry already. I always use full-fat everything for maximum creaminess (because let’s be honest, this isn’t the time to skimp). Here’s what you’ll need:
For the Crust:
- 1 1/2 cups chocolate cookie crumbs (I blitz Oreos or chocolate graham crackers in my food processor—sandwich filling and all)
- 1/4 cup melted unsalted butter (salted works in a pinch, but then skip the extra pinch of salt later)
For the Filling:
- 1 cup creamy peanut butter (not the natural kind—it’s too runny. I swear by Jif or Skippy for this)
- 8 oz cream cheese, softened to room temperature (leave it out for 30 minutes—no cheating with the microwave)
- 1 cup powdered sugar (sift it if yours is lumpy—trust me, it makes a difference)
- 1 tsp pure vanilla extract (imitation vanilla? In this pie? Never.)
- 1 1/2 cups heavy cream, chilled (cold cream whips up fluffier—I even chill my mixing bowl sometimes)
For Topping (Optional but Highly Recommended):
- 1/4 cup chopped salted peanuts (for that perfect salty crunch)
- Extra whipped cream or chocolate shavings (because why not?)
Equipment You’ll Need
You won’t need anything fancy here—just the basics from your kitchen. Grab a 9-inch pie dish (glass or ceramic works great), a couple of mixing bowls, an electric hand mixer (or stand mixer if you’re feeling fancy), and a rubber spatula for scraping every last bit of that creamy filling. Oh, and a food processor if you’re making your own cookie crumbs—though a zip-top bag and rolling pin work in a pinch.
How to Make No-Bake Peanut Butter Pie
Okay, let’s get to the fun part—making this dreamy pie. Don’t worry, it’s so easy you’ll wonder why you haven’t been making it every week. Just follow these simple steps, and you’ll have a showstopper dessert that looks like you spent hours on it (your secret’s safe with me).
Step 1: Prepare the Crust
First, grab that bowl of chocolate cookie crumbs and melted butter. Mix them together until it looks like wet sand—you’ll know it’s right when you can squeeze a handful and it holds its shape. Now, dump it into your pie dish and press it firmly with your fingers or the back of a spoon. Really get in there—you want a nice, even layer on the bottom and up the sides. Pop it in the fridge while you make the filling (this helps it set and prevents crumbly disasters later).
Step 2: Make the Filling
Here’s where the magic happens. In a large bowl, beat the peanut butter and softened cream cheese together until they’re completely smooth—no lumps allowed. Scrape down the sides with your spatula halfway through. Then, add the powdered sugar and vanilla, mixing just until combined (overmixing makes the filling stiff). Now, whip that chilled heavy cream in a separate bowl until stiff peaks form—this takes about 3 minutes with an electric mixer. Gently fold the whipped cream into the peanut butter mixture in thirds, using big, sweeping motions to keep it light and fluffy. Resist the urge to stir vigorously—we’re going for clouds, not concrete.
Step 3: Assemble and Chill
Take your chilled crust out of the fridge and spoon in the filling, smoothing the top with your spatula until it’s picture-perfect. If you’re feeling fancy, sprinkle those chopped peanuts on top or pipe some extra whipped cream around the edges. Now comes the hardest part—waiting. Chill the pie for at least 4 hours (overnight is even better). I know, I know—but trust me, that patience pays off when you slice into that perfectly set, creamy filling. Pro tip: If you’re in a hurry, 1 hour in the freezer will firm it up faster, but let it sit at room temperature for 10 minutes before serving.
Tips for the Best No-Bake Peanut Butter Pie
Here are my tried-and-true tips to make this pie absolutely perfect every time:
- Chill your mixing bowl and beaters before whipping the cream—it’ll fluff up faster and hold its shape better.
- Use creamy, shelf-stable peanut butter (not natural) for the smoothest filling—it won’t separate or make the pie oily.
- Press the crust firmly into the pie dish—this keeps it from crumbling when you slice it.
- For a firmer pie, freeze it for an hour before serving, then let it sit at room temperature for 10 minutes.
Variations for No-Bake Peanut Butter Pie
Oh, the possibilities. This pie is like a blank canvas for your peanut butter dreams. My kids love when I swap the chocolate cookie crust for crushed Oreos (filling included—no scraping needed). Almond butter makes a fun twist if you’re feeling fancy, though I’d add an extra tablespoon of powdered sugar to balance its milder flavor. For chocolate lovers, drizzle melted chocolate over the top before chilling—it hardens into the most satisfying crackly layer. And if you’re feeling wild, mix in a handful of mini chocolate chips with the filling. The best part? No matter how you tweak it, this pie stays gloriously no-bake and stress-free.
Serving and Storing No-Bake Peanut Butter Pie
This pie is best served chilled—I like to pull it from the fridge about 10 minutes before slicing so it’s firm but still creamy. A dollop of fresh whipped cream on top never hurts (I mean, when does it ever?). Leftovers? Ha, But if you somehow have some, cover it tightly with plastic wrap and refrigerate for up to 3 days. For longer storage, freeze individual slices wrapped in parchment paper—they keep beautifully for a month. Just thaw in the fridge overnight when that peanut butter craving strikes again (and trust me, it will).
No-Bake Peanut Butter Pie FAQs
Can I use crunchy peanut butter?
Sure, if you love that extra texture. Just know it’ll change the smooth, creamy filling a bit. I’d recommend sticking with creamy for the classic version, but hey, it’s your pie—do what makes you happy.
How long can I freeze this pie?
It freezes like a dream. Wrap it tightly in plastic wrap or aluminum foil, and it’ll keep for up to a month. Thaw it overnight in the fridge before serving. Pro tip: Slice it before freezing so you can grab just one piece when the craving hits.
Can I make this without cream cheese?
I wouldn’t recommend it—the cream cheese gives the filling its structure and tangy balance. If you’re dairy-free, try a vegan cream cheese alternative, but test it first to make sure it whips up nicely. cottage cheese can sometimes be used as a substitute in certain recipes, but for this pie, cream cheese is key.
Why is my filling not setting?
This usually happens if the cream wasn’t cold enough when whipped or if you overmixed it. Make sure everything is chilled, and fold gently to keep it light and airy. If it’s still too soft, pop it in the freezer for an hour before serving.
Nutritional Information
Okay, let’s be real—this no-bake peanut butter pie is a treat, not a health food. But because I know you’re curious (and maybe doing some mental calorie math before that second slice), here’s the scoop: One serving (about 1/8th of the pie) clocks in around 450 calories, with 32g of fat (hey, that’s where the creamy magic comes from). It’s got 25g of sugar—mostly from the peanut butter and powdered sugar—and about 9g of protein to balance things out. Remember, these numbers are estimates and can vary based on your specific ingredients. Now go enjoy that slice guilt-free—life’s too short to skip dessert.
Try this easy no-bake peanut butter pie today and share your results in the comments.
Follow us on Pinterest for more delicious recipes.
Find more easy Desserts ideas in our website.
Print20-Min No-Bake Peanut Butter Pie – Irresistibly Creamy Bliss

A creamy, no-bake peanut butter pie with a chocolate crust. Perfect for peanut butter lovers.
- Prep Time: 20 mins
- Cook Time: 0 mins
- Total Time: 4 hrs 20 mins
- Yield: 8 servings
- Category: Dessert
- Method: No-Bake
- Cuisine: American
- Diet: Vegetarian
Ingredients
- 1 1/2 cups chocolate cookie crumbs
- 1/4 cup melted butter
- 1 cup creamy peanut butter
- 8 oz cream cheese, softened
- 1 cup powdered sugar
- 1 tsp vanilla extract
- 1 1/2 cups heavy cream, whipped
- 1/4 cup chopped peanuts (optional)
Instructions
- Mix cookie crumbs and melted butter. Press into a pie dish to form the crust.
- In a bowl, beat peanut butter, cream cheese, powdered sugar, and vanilla until smooth.
- Fold in the whipped cream gently.
- Pour the filling into the crust and smooth the top.
- Sprinkle chopped peanuts on top if desired.
- Chill for at least 4 hours before serving.
Notes
- Use a food processor to make cookie crumbs quickly.
- Chill the whipped cream before folding for best texture.
- For a firmer pie, freeze for 1 hour before serving.


