Oh my gosh, you have to try these chocolate chip cookie bars. I’ve been baking them for years – they’re the first thing I ever learned to make without burning (well, most of the time). These magical little squares solve all my dessert emergencies – school bake sales, last-minute potlucks, even those “I need chocolate NOW” Tuesday afternoons. What I love most is how they combine everything wonderful about cookies (hello, melty chocolate) with the ease of bar cookies – no scooping required. My grandma taught me this recipe when I was eight, and I’ve probably made it a hundred times since. Trust me, once you taste that buttery, chocolate-packed goodness, you’ll understand why this is my go-to treat for every occasion.
Table of Contents

Why You’ll Love These Chocolate Chip Cookie Bars
Listen, I don’t just bake these all the time because they’re easy (though that’s a huge plus). Here’s what makes them absolutely irresistible:
- That perfect texture – Chewy edges with a slightly soft center, just like your dream chocolate chip cookie, but in convenient bar form. No more arguing over who gets the “middle cookie”.
- Chocolate in every bite – I use a full 2 cups of chips because, let’s be real, why would anyone want less chocolate? They melt into gooey pockets of joy.
- Foolproof baking – One bowl, no fancy techniques. Even my 8-year-old nephew can make these (with minimal supervision around the oven).
- Always a hit – I’ve served these at everything from baby showers to football parties, and the plate’s always empty within minutes. Even my “I don’t like sweets” uncle sneaks seconds.
Ingredients for Chocolate Chip Cookie Bars
Okay, here’s where the magic starts. I’ve learned over the years that using the right ingredients – and prepping them just so – makes all the difference between good cookie bars and “oh my gosh what is this sorcery” cookie bars. Here’s exactly what you’ll need:
- 1 cup (2 sticks) unsalted butter, softened – Not melted. Leave it out for about an hour until your finger leaves a gentle dent. This makes creaming the sugars so much easier.
- 1 cup granulated sugar – Just your basic white sugar, though I sometimes swap ¼ cup with coconut sugar for extra depth.
- 1 cup packed brown sugar – Pack it in the measuring cup like you’re mad at it – we want that rich molasses flavor. Light or dark both work great.
- 2 large eggs – Straight from the fridge is fine, but room temp blends better. Crack them into a separate bowl first (trust me, fishing out shell bits is no fun).
- 1 teaspoon vanilla extract – The real stuff, please. That imitation vanilla just doesn’t give the same warm flavor.
- 3 cups all-purpose flour – Spoon it into the measuring cup and level it off – no packing or you’ll get dense bars.
- 1 teaspoon baking soda – Make sure yours is fresh. If it doesn’t fizz when you add a drop of vinegar, toss it.
- ½ teaspoon salt – I prefer fine sea salt, but table salt works in a pinch.
- 2 cups chocolate chips – Here’s where I go wild. Semi-sweet are classic, but I’ll often mix in some dark chocolate chunks too. The more the merrier.
See? Nothing too fancy – just good old pantry staples ready to transform into something magical. Now let’s get mixing.
How to Make Chocolate Chip Cookie Bars
Alright, let’s dive into the fun part. I’ve made these cookie bars so many times I could probably do it in my sleep, but I’ll walk you through every step to make sure yours turn out perfect on the first try. Here’s exactly how it’s done:
- Preheat your oven to 350°F (175°C) – And don’t skip this. I learned the hard way that uneven heating leads to some bars overbaking while others stay doughy. Place a rack in the center position for even baking.
- Prep your pan – Grab that 9×13-inch baking pan and grease it well. I use butter and a light dusting of flour, but nonstick spray works too. Want extra insurance? Line it with parchment paper hanging over the edges for easy lifting later.
- Cream the butter and sugars – In a big mixing bowl, beat together the softened butter, granulated sugar, and brown sugar until it’s light and fluffy. This takes about 2-3 minutes with a hand mixer. You’ll know it’s ready when the mixture lightens in color and looks almost like wet sand.
- Add eggs and vanilla – Crack in those eggs one at a time, mixing well after each. Scrape down the sides of the bowl – those sneaky butter clumps love to hide there. Stir in the vanilla until everything smells amazing.
- Mix dry ingredients – In another bowl, whisk together the flour, baking soda, and salt. I like to give it about 30 whisks to make sure everything’s evenly distributed – no one wants a bite with too much baking soda.
- Combine wet and dry – Gradually add the dry ingredients to the wet, mixing just until no flour streaks remain. Overmixing makes tough bars, so when in doubt, stop early. The dough will be thick and glorious.
- Fold in chocolate chips – Here comes the best part. Dump in those chocolate chips and fold gently. I usually reserve a handful to sprinkle on top for extra visual appeal.
- Spread in pan – Transfer the dough to your prepared pan and press it evenly with damp fingers or a spatula. Get it into all the corners – we want uniform thickness for even baking.
- Bake 25-30 minutes – The edges should be golden brown and the center will look just set. A toothpick inserted near the center should come out with a few moist crumbs (not wet batter). Pro tip: At 22 minutes, I start the watch like a hawk – ovens vary.
- Cool completely – I know, the waiting is torture. But cutting warm bars leads to crumbly messes. Let them cool in the pan for at least an hour before slicing into squares.
Tips for Perfect Chocolate Chip Cookie Bars
After countless batches (and a few learning experiences), here are my can’t-miss tips for cookie bar perfection:
- Butter temperature is key – Too cold and it won’t cream properly; too warm and your bars spread too much. Perfect butter should give slightly when pressed but still hold its shape.
- Don’t overmix after adding flour – This develops gluten and makes bars tough. Stop as soon as you stop seeing flour streaks – a few small lumps are okay.
- Grease your pan well – Those corners are sneaky. I run a butter wrapper along every edge, then give a light flour dusting. Nothing worse than losing half your bars to the pan.
- Check early – Ovens lie. Start checking at 22 minutes. The bars will continue cooking slightly as they cool, so it’s better to slightly underbake than overbake.
- Let them cool – I know it’s hard, but seriously, wait. Cutting warm makes them fall apart. The texture sets perfectly as they cool.
- Line your pan – For super clean removal, parchment paper with overhanging edges lets you lift the whole slab out to cut. Game changer for pretty edges.
Follow these tips and you’ll have foolproof, bakery-worthy chocolate chip cookie bars every single time. Now who’s ready for a taste test?
Variations for Chocolate Chip Cookie Bars
Once you’ve mastered the classic version (which is perfect as-is, no arguments here), it’s time to play around with some fun twists. I love experimenting with these bars – they’re like a blank canvas for all my chocolate chip cookie fantasies. Here are my favorite ways to mix things up when I’m feeling creative:
- Nutty delight – Fold in 1 cup of chopped walnuts or pecans with the chocolate chips. The toasty crunch takes these to another level. My dad always requests them this way.
- Caramel swirl – Before baking, drizzle ½ cup of caramel sauce over the batter and swirl gently with a knife. The caramel bakes into gooey ribbons that make these bars truly decadent.
- Double chocolate – Replace ½ cup of flour with cocoa powder for rich chocolate-on-chocolate action. I like to use dark chocolate chips here for extra intensity.
- M&M magic – Swap half the chocolate chips for colorful M&Ms – perfect for holidays or birthdays. The candy shells add a fun crunch too.
- Sea salt sprinkle – Right after baking, sprinkle the top with flaky sea salt. The salty-sweet combo is seriously addictive. I use Maldon salt for those pretty flakes.
- Peanut butter cups – Chop up 1 cup of peanut butter cups and mix them in. They get melty and amazing – my nephew’s absolute favorite version.
- Espresso kick – Add 1 tablespoon instant espresso powder to the dry ingredients. It doesn’t make them taste like coffee, but deepens the chocolate flavor beautifully.
The best part? You can mix and match these ideas. Last Christmas I did walnut-caramel bars with a sea salt topping, and they disappeared before I could even take a photo. Whatever variation you choose, just remember to keep the total add-ins around 2-3 cups so the bars don’t get too heavy. Now go forth and customize – your perfect chocolate chip cookie bar is waiting to be created.

Storing and Serving Chocolate Chip Cookie Bars
Here’s the thing about these cookie bars – they never last long in my house. But when you do need to store them (or, you know, hide them from yourself), here’s how to keep them tasting fresh and delicious:
Room temperature storage: These babies stay perfect for up to 5 days when stored in an airtight container at room temp. I like to layer them between parchment paper so they don’t stick together. The trick is making sure they’re completely cool first – any warmth will create condensation and make them soggy.
Freezing for later: Oh yes, these freeze beautifully. Here’s my method:
- Cut cooled bars into squares
- Wrap each individually in plastic wrap (prevents freezer burn)
- Place in a freezer bag or airtight container
- Freeze for up to 3 months
When the craving hits, just thaw at room temperature for about an hour. Or pop one in the microwave for 10 seconds if you need instant gratification.
Serving suggestions: While these are amazing at room temp, I’ve discovered a few next-level ways to enjoy them:
- Slightly warmed with a scoop of vanilla ice cream (the chocolate gets all melty – wow)
- Drizzled with extra melted chocolate or caramel sauce for special occasions
- Paired with a cold glass of milk – classic never fails
- Crumbled over yogurt for breakfast (don’t judge, it’s basically granola)
One pro tip: If you’re serving these at a party, I like to cut them smaller than usual – about 1.5-inch squares. They look more elegant and let people sample other desserts too (though let’s be real, these usually go first).
The only real rule? Enjoy them however you like best. Whether it’s straight from the pan while still warm (I won’t tell) or perfectly chilled from the fridge, these bars are versatile enough to please any cookie lover.
Chocolate Chip Cookie Bars Nutritional Information
Okay, let’s talk numbers – but don’t let this scare you away from enjoying every delicious bite. These estimates are based on using exact ingredients in the recipe and cutting the pan into 24 equal bars (though who are we kidding, my “equal” slices tend to get bigger as the pan empties). Keep in mind that different brands of chocolate chips or butter can slightly change the numbers, but here’s the general breakdown per serving:
- Calories: About 220 per bar – totally worth it for that chocolatey goodness
- Total Fat: 10g (6g saturated) – most comes from the butter and chocolate
- Cholesterol: 30mg – all from those beautiful eggs and butter
- Sodium: 100mg – just enough to balance the sweetness
- Total Carbohydrates: 30g (18g sugars, 1g fiber) – hello, brown sugar magic
- Protein: 2g – a little bonus from the eggs and flour
Now, here’s my baking truth – I’m not a nutritionist, and these numbers can wiggle around based on exactly what brands you use. That organic cane sugar? Might measure differently than standard white sugar. Those fancy chocolate chunks? Maybe more cacao percentage than standard chips. The main thing is that these bars are meant to be enjoyed in moderation as part of a balanced diet (says the woman who definitely eats them for breakfast sometimes).
If you’re watching specific dietary needs, you can tweak the recipe – like using a sugar substitute or gluten-free flour blend, though I can’t promise identical results. But for most of us, these numbers just help balance out that second (or third…) square we know we’re going to eat anyway.
FAQs About Chocolate Chip Cookie Bars
Over the years, I’ve gotten so many questions about these chocolate chip cookie bars – and I’ve probably asked most of them myself during my baking adventures. Here are the answers to the ones that come up most often:
Can I freeze chocolate chip cookie bars?
Absolutely, These freeze like a dream. Just wrap cooled bars tightly in plastic wrap, then pop them in a freezer bag. They’ll stay perfect for up to 3 months. When the craving hits, thaw at room temperature or microwave for 10 seconds for that fresh-from-the-oven feeling.
Can I use melted butter instead of softened?
I’ve tried both ways, and while melted butter works in a pinch, softened butter gives better texture. Melted butter makes the bars spread more and can make them greasy. If you’re in a hurry, microwave cold butter in 5-second bursts until just soft enough to dent with your finger.
Why did my bars turn out cakey instead of chewy?
This usually means either too much flour (always spoon and level) or overmixing after adding the flour. Next time, try reducing the flour by 2 tablespoons and mix just until combined. Also, don’t overbake – pull them when the edges are set but the center still looks slightly underdone.
Can I make these without eggs?
I’ve had success using flax eggs (1 tbsp ground flax + 3 tbsp water per egg) for vegan friends. The texture changes slightly – they’re more dense but still delicious. For nut allergies, applesauce (¼ cup per egg) works too, though the bars will be cakier.
Ready to Bake Your Own Chocolate Chip Cookie Bars?
There you have it – everything I’ve learned from years of baking (and eating) these incredible chocolate chip cookie bars. From that first magical moment when the butter and sugar cream together to the heavenly smell filling your kitchen as they bake, this recipe never fails to bring joy. Whether you stick with the classic version or try one of the fun variations, I know you’re going to love them as much as my family does. So what are you waiting for? Grab that mixing bowl and get baking. And when you do, I’d love to hear how they turned out – leave a comment below telling me your favorite part (or how many disappeared before they even cooled). Happy baking.
These Chocolate Chip Cookie Bars deliver all the classic flavor you love in just 30 minutes—soft, chewy, and perfect for any craving. If you love easy bar desserts, you’ll also enjoy our Fudgy Brownies or our Lemon Glaze Cookies. We’d love to see your baking results—share them with us on Facebook Find more quick treats in our dessert recipes collection. PrintIrresistible Chocolate Chip Cookie Bars in 30 Minutes
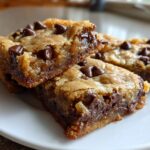
Delicious chocolate chip cookie bars perfect for any occasion. These bars are soft, chewy, and packed with chocolate chips.
- Prep Time: 15 minutes
- Cook Time: 25 minutes
- Total Time: 40 minutes
- Yield: 24 bars
- Category: Dessert
- Method: Baking
- Cuisine: American
- Diet: Vegetarian
Ingredients
- 1 cup (2 sticks) unsalted butter, softened
- 1 cup granulated sugar
- 1 cup packed brown sugar
- 2 large eggs
- 1 teaspoon vanilla extract
- 3 cups all-purpose flour
- 1 teaspoon baking soda
- 1/2 teaspoon salt
- 2 cups chocolate chips
Instructions
- Preheat your oven to 350°F (175°C). Grease a 9×13-inch baking pan.
- In a large bowl, cream together the butter, granulated sugar, and brown sugar until smooth.
- Beat in the eggs one at a time, then stir in the vanilla.
- In a separate bowl, whisk together the flour, baking soda, and salt.
- Gradually add the dry ingredients to the wet ingredients, mixing until just combined.
- Fold in the chocolate chips.
- Spread the dough evenly into the prepared baking pan.
- Bake for 25-30 minutes or until the edges are golden brown.
- Let cool in the pan before cutting into bars.
Notes
- Store in an airtight container for up to 5 days.
- Use room temperature butter for best results.
- For a nutty twist, add 1/2 cup chopped walnuts.