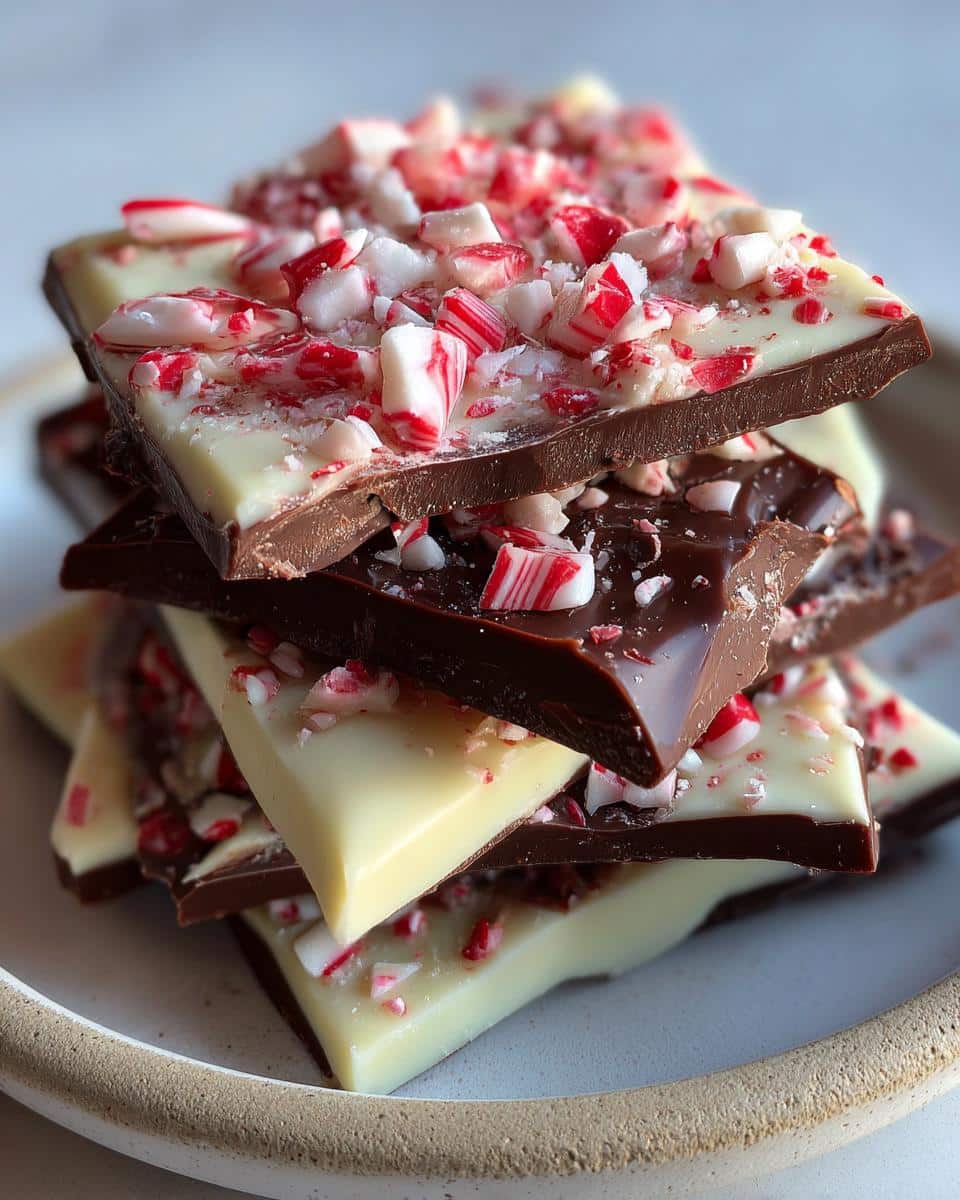
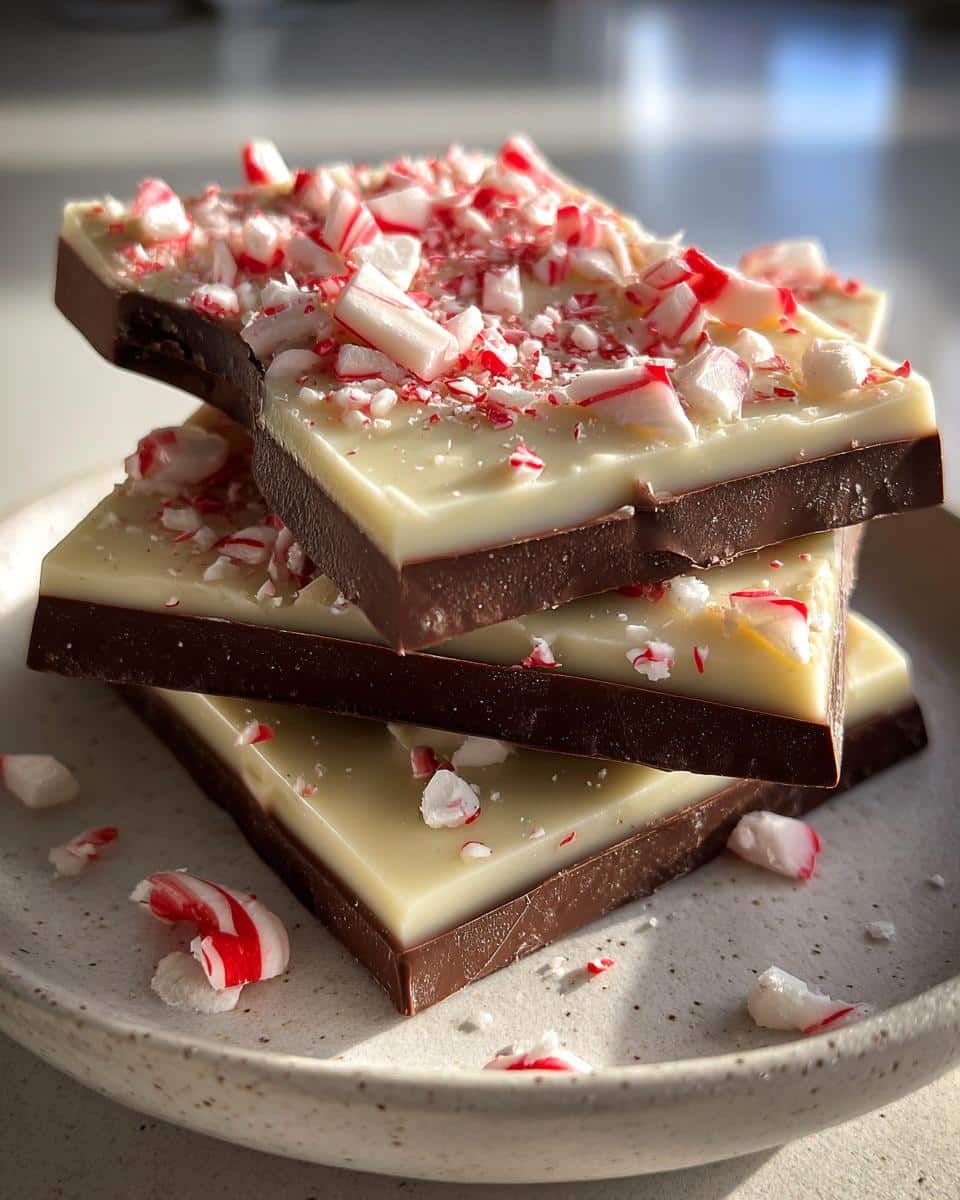
The holidays just aren’t complete without a batch of my famous Chocolate Peppermint Bark cooling on the counter. This classic treat combines a rich base of semi-sweet chocolate with a smooth layer of creamy white chocolate, all topped off with that satisfying crunch of crushed candy canes. It’s the perfect balance of sweet and minty that everyone craves this time of year.
I actually started making this recipe years ago when I was totally broke and needed gifts for all my coworkers. I remember standing in my tiny apartment kitchen, smashing peppermints in a bag with a rolling pin and hoping for the best. Now, it’s the one thing my friends beg for every single December. It’s festive, incredibly fast to throw together, and honestly tastes a million times better than those expensive tins you buy at the store.
Table of Contents
Why You’ll Love This Chocolate Peppermint Bark Recipe
Let’s be honest, December is pure chaos in the kitchen. That’s why I turn to this recipe when I’m running low on time but still want to wow my guests. It’s a total lifesaver because it looks gorgeous but requires zero technical skills. Trust me, this will become your go-to treat.
- Strictly No-Bake: You keep the oven off for this one. It’s all about the microwave and the fridge, which is a huge relief when you’re already baking a million cookies.
- Looks professional: Those distinct dark and white layers make it look like expensive candy shop treats. Your family won’t believe you made it in your pajamas.
- Classic flavor: The mix of rich semi-sweet and sweet white chocolate with cool peppermint is just unbeatable. It tastes exactly like Christmas should.
- The ultimate Holiday Food Gift: I break this into shards and toss them in cute cellophane bags with a red ribbon. It makes a thoughtful, homemade present that everyone actually wants to eat.
Ingredients for Chocolate Peppermint Bark
You won’t believe you can make something this good with just four simple ingredients. But here is the secret: because the list is so short, the quality of what you buy truly makes or breaks the final taste. I learned this the hard way years ago when a batch of cheap chocolate turned into a gritty, seized-up mess in my microwave.
- 12 ounces high-quality semi-sweet chocolate chips: I usually grab a bag of Ghirardelli or Guittard for this. You want chocolate that melts down into a glossy, smooth pool. If you use the super cheap generic stuff, it often has weird stabilizers that prevent a smooth finish.
- 12 ounces white chocolate chips: This is my most important rule—check the label You absolutely need chips that list “cocoa butter” in the ingredients. If you see palm oil or vegetable oil, put it back on the shelf. Real cocoa butter is the only way to get that creamy melt rather than a waxy coating.
- 1 teaspoon pure peppermint extract: Make sure the bottle says “peppermint” and not just “mint,” or your bark might end up tasting like toothpaste. You’ll split this between the layers to get that perfect holiday flavor throughout.
- 1/2 cup candy canes: You’ll need to crush these into small pieces. I usually just buy a standard box of candy canes, but those round peppermint candies work perfectly fine if that’s what you have hiding in your pantry.
Equipment Needed
You really don’t need a fancy kitchen setup to pull this off. Just grab your trusty large baking sheet and line it with parchment paper or a silicone baking mat. This step is non-negotiable unless you want to be scraping hardened chocolate off your pan for hours.
You’ll also need two microwave-safe bowls and a good silicone spatula. Here is my biggest rule: make sure those bowls are bone-dry before you start. Even a tiny drop of water can cause the chocolate to seize into a gritty, clumpy nightmare, so wipe them down twice.
How to Make Chocolate Peppermint Bark
My method is simple, but you have to move with purpose to get those beautiful, distinct layers. I always start with the dark chocolate base. Pop your semi-sweet chips in the microwave, but listen to me on this—only do 30-second intervals. It’s tempting to nuke it for a minute, but you’ll scorch the chocolate. Stir vigorously between every single burst. The residual heat melts the chips, so stirring does the real work.
Once it’s glossy and smooth, stir in half that peppermint extract—it smells like Christmas instantly Spread this mixture into a thin, even rectangle on your prepared pan. Now, you have to be patient. Slide the tray into the fridge and set a timer for exactly 20 minutes. If you rush this, the layers will muddy together later.
While that chills, melt your white chocolate using the exact same 30-second method. Be extra careful here, because white chocolate is finicky and burns if you look at it wrong. Stir in the rest of the extract, and get ready to move fast.
Pour the white chocolate over the completely set dark layer. I use an offset spatula to spread it quickly and gently. Don’t press down If you drag the spatula too hard, you’ll pull up streaks of dark chocolate. Just glide it over the top. Immediately sprinkle your crushed candy canes while the white chocolate is still wet and sticky. After another 20 minutes in the fridge, lift the whole slab up and snap it into rustic, jagged pieces with your hands. That’s the fun part.
Tips for the Best Chocolate Peppermint Bark
I’ve made enough batches of this to fill a sleigh, and I’ve learned a few tricks the hard way. My biggest headache used to be the layers peeling apart like a bad sticker after they cooled. The secret is temperature control. You want the dark chocolate layer to be set enough to hold its shape, but not ice-cold frozen. If it’s too cold, the warm white chocolate shocks it, and they won’t bond properly.
Also, I can’t stress this enough: keep water far away, I ruined a beautiful bowl of Guittard chips last year because I used a slightly damp spoon. The chocolate seized up instantly into a gritty, clumpy mess that I couldn’t save. Just dry everything twice before you start.
Finally, think about how you want to serve it. I personally love the rustic look of snapping it into uneven shards with my hands—it feels more homemade to me. But if you’re the type who loves perfect, bakery-style squares, use a sharp knife to gently score the top layer about 5 minutes after putting it in the fridge. Then, you can snap it cleanly along those lines once it’s fully solid.
Variations for Your Chocolate Peppermint Bark
While I mostly stick to the classic recipe because it’s tradition, it is honestly so fun to play around with flavors once you get the technique down. If you have a serious sweet tooth like my sister, try swapping the semi-sweet base for milk chocolate. It makes the bark taste just like a giant, creamy candy bar On the flip side, using a 70% dark chocolate base adds a sophisticated bitterness that balances out the sweet white layer perfectly.
You definitely don’t have to stop at just candy canes, either. My kids go crazy when I use festive red and green sprinkles for a pop of color instead of mints. For a different kind of crunch, I sometimes scatter crushed chocolate sandwich cookies on top—it gives you a total cookies-and-cream vibe that vanishes instantly at parties. I’ve even tried adding chopped dried cranberries for a chewy, tart contrast that surprisingly works
Storing Your Chocolate Peppermint Bark
Honestly, this bark disappears so fast in my house that storage is rarely an issue But if you are hiding some away for gifts, just pop the pieces into a sturdy airtight container. I usually keep mine on the counter in a cool corner, but if your kitchen gets toasty like mine does during a baking marathon, definitely stick it in the fridge so the layers stay crisp.
It stays fresh for about two weeks this way. You can even freeze it for months if you want to get a head start on the season—just let it thaw a bit before biting down so you don’t chip a tooth.
Common Questions About Chocolate Peppermint Bark
Q1. Why did my dark and white chocolate layers separate?
Oh, I’ve been there, and it is so frustrating This usually happens because of temperature shock. If you let the bottom dark layer get ice-cold in the fridge (like leaving it in for an hour instead of 20 minutes), the warm white chocolate hardens instantly on contact and doesn’t actually bond. They just sit next to each other like bad roommates until you break them apart, so keep an eye on the clock
Q2. Can I use chocolate bars instead of chips?
Yes, you definitely can Honestly, high-quality baking bars often melt even smoother than chips because they don’t have those shape-holding stabilizers. Just grab a sharp knife and chop the bars into really fine, uniform pieces before microwaving. This ensures your Peppermint Bark Recipe turns out silky smooth instead of lumpy.
Q3. Is this recipe gluten-free?
Generally, yes Chocolate and peppermint extract are usually safe. However, you need to be a detective with your candy cane labels. Some brands use wheat starch as a thickener or process their sweets on shared equipment. Always double-check the box if you are making Homemade Christmas Candy for friends with allergies
Nutritional Information
I usually try to turn a blind eye to calorie counting during the holidays—it is the season for indulging, right? But if you are curious, each piece of this bark packs about 150 calories, with roughly 9g of fat and 18g of carbs. Just remember these are rough estimates The numbers will shift a bit depending on the specific brand of chocolate chips you toss into your cart.
Share Your Creation
I absolutely love seeing this recipe come to life in your kitchens If you make it, please drop a comment and a rating below. Even better, share a photo—it makes my day.
PrintChocolate Peppermint Bark: My Famous 4-Ingredient Recipe

This chocolate peppermint bark layers rich semi-sweet chocolate with creamy white chocolate. Crushed candy canes add a festive crunch and minty flavor. You can break the chilled slab into rustic shards for serving. It works well as a homemade holiday gift.
- Prep Time: 15 minutes
- Cook Time: 5 minutes
- Total Time: 1 hour
- Yield: 24 pieces
- Category: Dessert
- Method: Chilling
- Cuisine: American
- Diet: Vegetarian
Ingredients
- 12 ounces semi-sweet chocolate chips
- 12 ounces white chocolate chips
- 1 teaspoon peppermint extract, divided
- 1/2 cup crushed candy canes
Instructions
- Line a large baking sheet with parchment paper or a silicone mat.
- Melt the semi-sweet chocolate in a microwave-safe bowl in 30-second intervals.
- Stir the chocolate between intervals until completely smooth.
- Mix in 1/2 teaspoon of peppermint extract.
- Spread the dark chocolate into an even layer on the prepared baking sheet.
- Refrigerate the tray for 20 minutes until the chocolate sets.
- Melt the white chocolate in a clean bowl using the same interval method.
- Stir in the remaining 1/2 teaspoon of peppermint extract.
- Pour the white chocolate over the set dark chocolate layer.
- Spread the white chocolate quickly and gently to cover the dark layer.
- Sprinkle the crushed candy canes immediately over the wet white chocolate.
- Refrigerate the bark for 20 minutes until fully firm.
- Lift the bark from the sheet and break it into uneven pieces.
Notes
- Dry your bowls thoroughly before melting chocolate to prevent seizing.
- Wait for the dark chocolate to set fully before adding the white layer.
- Store the finished bark in an airtight container at room temperature.