Oh my gosh, you have to try this simple homemade pita bread recipe. I swear, once you taste that warm, pillowy softness straight from the skillet, you’ll never want store-bought again. It’s crazy how something so delicious comes together with just flour, water, and a few pantry staples.
I first tried making pita bread when I ran out of sandwich bread one lazy Sunday afternoon. Now? I whip up a batch almost weekly – it’s that easy. These golden rounds puff up like magic in the pan, creating that perfect pocket for stuffing with all your favorite fillings. Whether you’re dipping them in hummus, wrapping up falafel, or just nibbling them warm with a drizzle of olive oil, homemade pita bread transforms any meal into something special.
The best part? No fancy equipment needed – just your hands, a bowl, and a skillet. Even my bread-baking disasters (and trust me, I’ve had plenty) can’t ruin this foolproof recipe. In about an hour, you’ll have the most satisfyingly fresh bread imaginable, with that irresistible homemade taste no supermarket bag can match.
Table of Contents
Magically Fluffy Simple Homemade Pita Bread in 60 Minutes

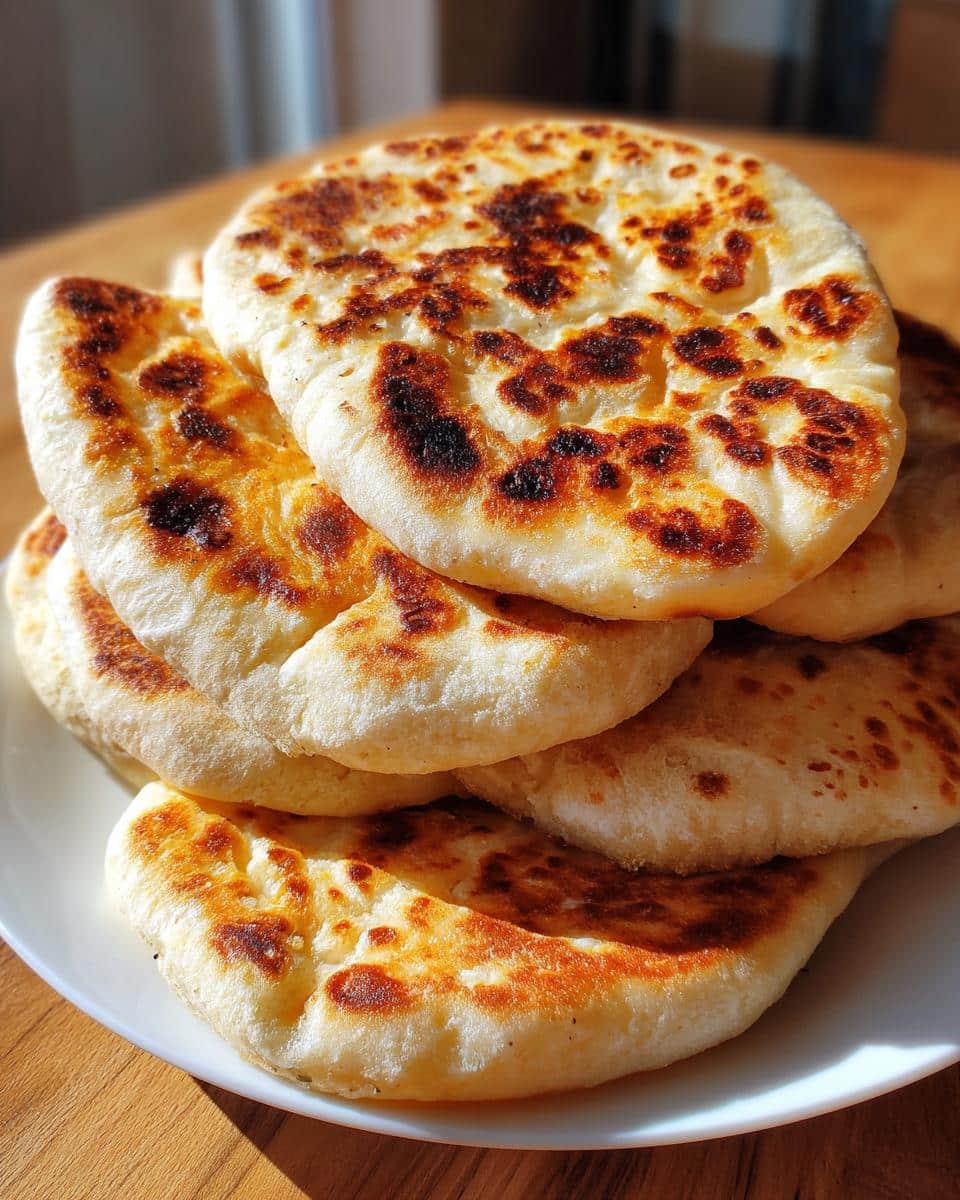
Make soft and fluffy homemade pita bread with this easy recipe. Perfect for sandwiches, dipping, or as a side dish.
- Prep Time: 15 minutes
- Cook Time: 20 minutes
- Total Time: 1 hour 35 minutes
- Yield: 8 pitas
- Category: Bread
- Method: Stovetop
- Cuisine: Mediterranean
- Diet: Vegetarian
Ingredients
- 3 cups all-purpose flour
- 1 teaspoon salt
- 1 tablespoon sugar
- 1 packet (2 1/4 teaspoons) active dry yeast
- 1 1/4 cups warm water
- 2 tablespoons olive oil
Instructions
- Mix flour, salt, sugar, and yeast in a bowl.
- Add warm water and olive oil, then knead into a smooth dough.
- Cover and let rise for 1 hour or until doubled in size.
- Divide dough into 8 equal pieces and roll into circles.
- Cook on a hot skillet for 2-3 minutes per side until puffed and lightly browned.
Notes
- Let the dough rise in a warm place for best results.
- Store leftover pita bread in an airtight container.
- Reheat in a skillet or oven for freshness.
Why You’ll Love This Simple Homemade Pita Bread
Listen, I’m not exaggerating when I say this pita bread recipe will change your kitchen game. Here’s why you’re going to adore it:
- Unbelievably soft texture – That first bite of warm, pillowy bread fresh off the skillet? Absolute magic.
- Ready in under 2 hours – Most of that’s hands-off rising time while you do other things.
- Crazy versatile – Sandwiches, dips, pizza bases, breakfast pockets… I’ve even used leftovers for bread pudding.
- No bread machine needed – Just your hands and a skillet – no fancy equipment required.
- Tastes like childhood – That authentic, slightly smoky flavor takes me straight back to my grandma’s kitchen.
Seriously, once you see those golden rounds puff up like magic, you’ll be hooked. And wait until you try tearing off a piece still warm from the pan – pure bliss.

Ingredients for Simple Homemade Pita Bread
Gather these simple staples – I bet you have most in your pantry right now:
- 3 cups all-purpose flour (scoop and level – don’t pack it)
- 1 teaspoon salt (I use fine sea salt)
- 1 tablespoon sugar (or honey/maple syrup – see notes)
- 1 packet (2 1/4 teaspoons) active dry yeast
- 1 1/4 cups warm water (about 110°F – baby bottle warm)
- 2 tablespoons olive oil (plus extra for greasing)
Ingredient Notes & Substitutions
Flour: You can swap up to half with whole wheat flour, but the pitas will be denser. Bread flour works too for extra chew.
Yeast: If using instant yeast, skip the proofing step – just mix it right in with the dry ingredients.
Sweetener: That tiny bit of sugar helps the yeast, but honey or maple syrup work beautifully. Just dissolve it in the warm water first.
Oil: Any neutral oil works, but olive oil adds lovely flavor. For dairy-free, brush cooked pitas with melted butter instead of oil.
How to Make Simple Homemade Pita Bread
Okay, let’s get our hands floury. This process is so satisfying – watching that dough transform from shaggy mess to pillowy perfection still feels like kitchen magic to me every single time. Follow these steps, and you’ll be flipping golden pitas in no time.
Step 1: Mix the Dough
First, whisk together your flour, salt, sugar, and yeast in a big bowl. Make sure your water is warm – think baby bottle temperature, not hot tub. Too hot, and you’ll kill the yeast (been there, cried over that dough). Pour in the water and olive oil, then mix until a shaggy dough forms. It’ll look messy at first – that’s totally normal.
Step 2: Knead and Let Rise
Now comes the fun part – kneading. Turn your dough onto a lightly floured surface and knead for about 5 minutes by hand (or 3 minutes with a dough hook). You’re looking for smooth, elastic dough that springs back when poked. Pop it back in the bowl, cover with a damp towel, and let it rise in a warm spot for 1 hour. I like using my oven with just the light on – perfect cozy environment for happy yeast.
Step 3: Shape and Cook
After your dough has doubled in size (so satisfying), punch it down and divide into 8 equal balls. Roll each into a 6-inch circle – don’t stress about perfect shapes, rustic is charming. Heat a dry skillet over medium-high until a water drop sizzles. Cook each pita for 2-3 minutes per side until puffed like little balloons with golden spots. That puff is your golden ticket – it means you’ve got perfect pockets for stuffing.
Tips for Perfect Simple Homemade Pita Bread
After burning my fair share of pitas (and nearly giving up entirely that one smoky afternoon), I’ve learned a few tricks to guarantee perfect results every time:
- Test your skillet heat with a few drops of water – they should dance and evaporate in 2 seconds. Too hot? They’ll burn. Too cool? No puff.
- Keep cooked pitas covered with a clean kitchen towel – this traps steam to keep them soft while you finish the batch.
- Go easy on the flour when rolling – too much makes the dough slide around instead of stretch. A light dusting is all you need.
- Don’t peek too soon _ Resist lifting the pita for at least 90 seconds – that’s when the magic puff happens.
- No puff? No problem. Still tastes amazing – just call it flatbread and load it up with toppings.
Trust me, once you get the hang of it, you’ll be flipping perfect pitas like a pro. And that first successful balloon-like puff? Pure kitchen triumph.
Serving and Storing Simple Homemade Pita Bread
Oh, the possibilities with fresh pita bread. My absolute favorite way? Ripping off a warm piece and dunking it straight into homemade hummus – that combination is pure bliss. But honestly, they’re fantastic with everything. Try stuffing them with falafel and tahini sauce for the ultimate sandwich, or use them as edible spoons for tzatziki and baba ganoush. Morning tip: warm pita with scrambled eggs and feta makes the most satisfying breakfast pocket.
Now, about keeping these beauties fresh – they’re best eaten the same day (not that they last long in my house). If you do have leftovers, store them in an airtight bag at room temperature for up to 2 days. Want to keep them longer? Stack cooled pitas with parchment between each, seal in a freezer bag, and freeze for up to a month. To revive, just pop frozen pitas in a 350°F oven for 3-5 minutes – they’ll taste almost fresh-baked again.
Pro tip from my many “oops” moments: Never refrigerate pita bread – it turns them tough and dry almost instantly. And if your day-old pitas have lost their softness, sprinkle with water and warm in the oven for a magical second life. Trust me, once you’ve had homemade, you’ll find excuses to make them weekly – my kids now request “pizza pitas” every Friday.
FAQs About Simple Homemade Pita Bread
Q1. Can I use instant yeast instead of active dry yeast?
Absolutely, Just skip the proofing step and mix instant yeast right in with the dry ingredients. The rising time stays the same – about 1 hour for that perfect fluffy texture.
Q2. Why didn’t my pitas puff up?
Don’t panic, The most common culprits are: skillet not hot enough (test with water drops first), dough rolled too thick, or peeking too soon. But even flat pitas taste delicious – just call them flatbreads and load ’em up.
Q3. Can I make the dough ahead?
You bet, After the first rise, punch it down, wrap tightly, and refrigerate overnight. Let it come to room temperature for 30 minutes before shaping and cooking. The flavor actually improves.
Q4. What’s the best way to reheat pita bread?
My favorite trick: sprinkle with a few drops of water and warm in a 350°F oven for 3-5 minutes. The steam brings back that fresh-baked softness. A quick skillet toast works too.
Q5. Can I freeze homemade pita bread?
Yes, Cool completely, then stack with parchment paper between each pita. Seal in a freezer bag and freeze for up to a month. Thaw at room temperature or reheat straight from frozen.
Nutritional Information
Just so you know what you’re biting into – each warm, fluffy pita comes in at about 180 calories, with 3g fat and 32g carbs. Of course, these numbers can vary slightly depending on your exact ingredients and brands. But let’s be real – when they’re this fresh and delicious, who’s counting?
Try this recipe and share your results in the comments. I’d love to hear how your pita bread turns out – and what creative ways you find to enjoy it. You can also check out our Pinterest page for more inspiration.


