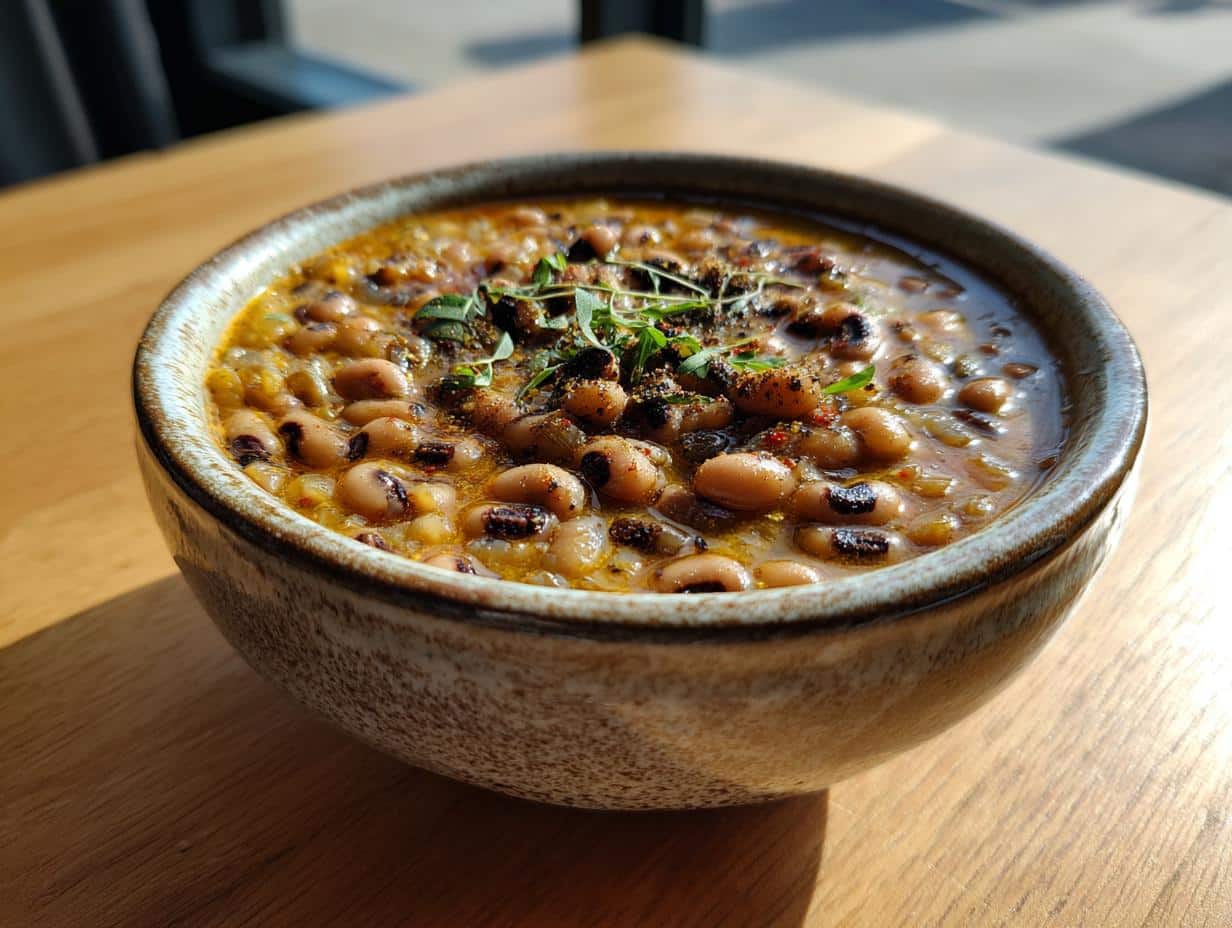
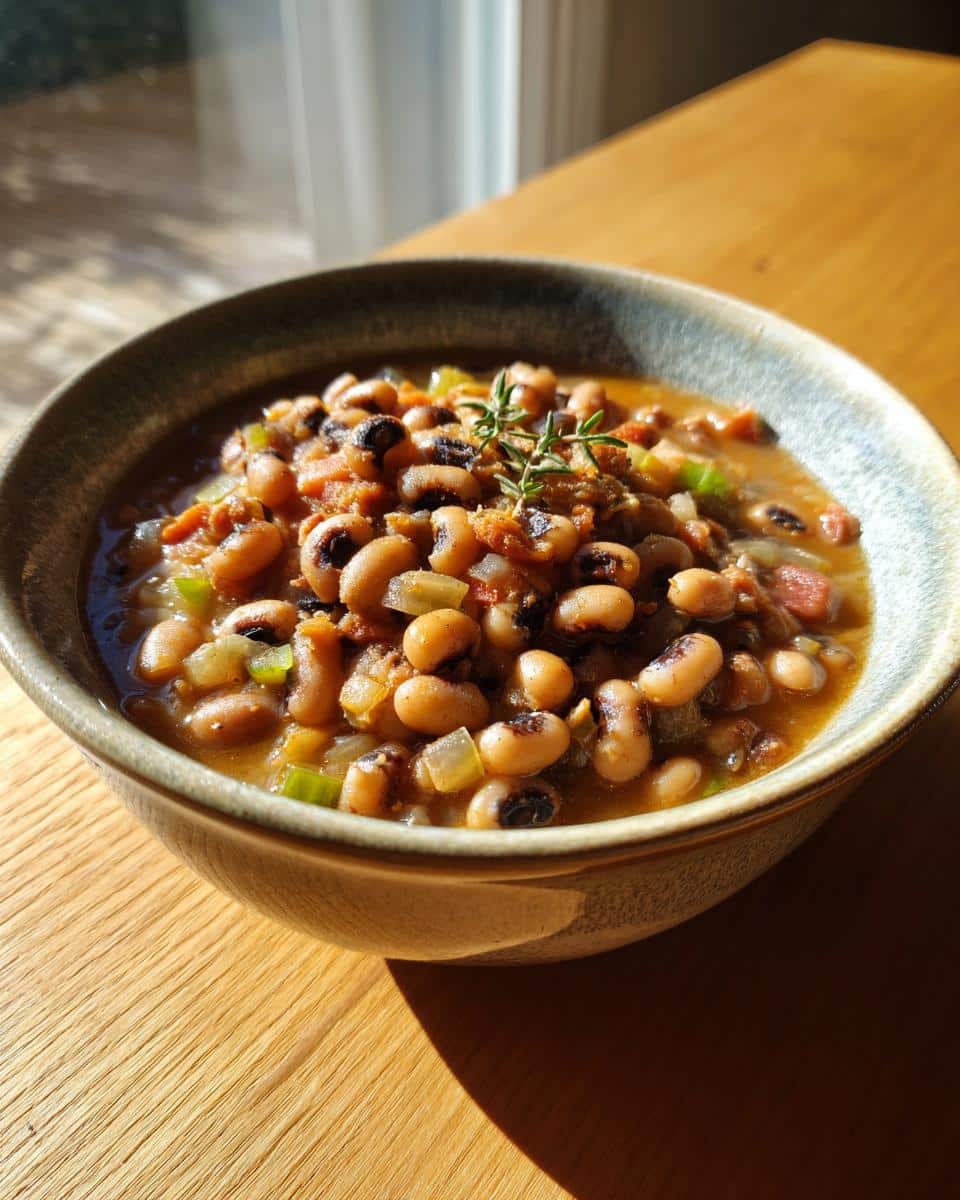
Growing up in the South, New Year’s Day meant one thing in our house – a big pot of black-eyed peas simmering on the stove all morning. My grandma swore it brought good luck (and let’s be honest, her version definitely brought happy bellies). These days, I’ve traded her old Dutch oven for my trusty Instant Pot – same delicious Hoppin’ John flavor in a fraction of the time. Whether you’re keeping tradition alive or just craving some comfort food, this Instant Pot Black-Eyed Peas recipe delivers that hearty, soul-warming goodness without the all-day wait. And yes, I still make it every January 1st – some traditions are too good (and too tasty) to break.
Table of Contents
Instant Pot Black-Eyed Peas: Soul-Warming Southern Comfort

A quick and easy Instant Pot recipe for black-eyed peas, also known as Hoppin’ John, perfect for New Year’s Day or any time you want a hearty meal.
- Prep Time: 10 mins
- Cook Time: 25 mins
- Total Time: 35 mins
- Yield: 6 servings
- Category: Main Dish
- Method: Pressure Cook
- Cuisine: Southern
- Diet: Vegetarian
Ingredients
- 1 lb dried black-eyed peas, rinsed and drained
- 4 cups vegetable broth
- 1 medium onion, diced
- 1 green bell pepper, diced
- 2 celery stalks, diced
- 3 garlic cloves, minced
- 1 tsp smoked paprika
- 1 tsp dried thyme
- 1 bay leaf
- 1/2 tsp salt
- 1/4 tsp black pepper
Instructions
- Add all ingredients to the Instant Pot.
- Close the lid and set the valve to sealing.
- Cook on high pressure for 25 minutes.
- Allow natural pressure release for 10 minutes.
- Remove the bay leaf before serving.
Notes
- Soak the peas overnight for a creamier texture.
- Add diced tomatoes for extra flavor.
- Serve over rice for a complete meal.
Why You’ll Love This Instant Pot Black-Eyed Peas Recipe
This isn’t just any pot of beans – it’s the kind of recipe that’ll make you wonder how something so simple tastes so darn good. Here’s why it’s become my go-to:
- Speedy comfort food: Done in under an hour – no babysitting a bubbling pot all morning
- Good luck charm: My Southern grandma’s superstition says these bring prosperity (and they definitely bring full stomachs)
- Vegetarian magic: Hearty enough to satisfy meat-eaters but 100% plant-based
- Set-it-and-forget-it ease: Dump everything in the Instant Pot and walk away – no stirring, no fuss
- Meal prep superstar: Tastes even better the next day (if there’s any left)

Ingredients for Instant Pot Black-Eyed Peas (Hoppin’ John)
Here’s where the magic starts – with simple ingredients that come together like old friends. I’ve made this enough times to know exactly what works (and what absolutely doesn’t). Trust me, no fancy grocery runs needed – just good, honest pantry staples:
- 1 lb dried black-eyed peas – rinsed and drained (those little pebbles will plump up beautifully)
- 4 cups vegetable broth – homemade if you’ve got it, but boxed works great too
- 1 medium onion – diced (I like yellow for sweetness, but white works too)
- 1 green bell pepper – diced small (this is the flavor backbone, don’t skip it)
- 2 celery stalks – diced (leaves and all for extra flavor)
- 3 garlic cloves – minced (or more if you’re feeling bold)
- 1 tsp smoked paprika – the secret weapon for that deep, rich flavor
- 1 tsp dried thyme – rub it between your fingers to wake up the oils
- 1 bay leaf – the quiet hero that ties everything together
- 1/2 tsp salt – plus more to taste after cooking
- 1/4 tsp black pepper – freshly ground if you can
That’s it, Now grab your Instant Pot and let’s make some magic happen. Oh, and if you’re feeling adventurous, keep reading for my favorite optional add-ins that take this from good to “can I have seconds?” good.
Equipment You’ll Need
- Instant Pot (6-quart or larger works best)
- Cutting board
- Chef’s knife
- Measuring cups
- Measuring spoons
- Wooden spoon (for stirring)
- Colander (for rinsing the peas)
How to Make Instant Pot Black-Eyed Peas (Hoppin’ John)
Okay, let’s get cooking. This is where the magic happens – turning those simple ingredients into a pot of pure comfort. I’ve made this so many times I could do it in my sleep, but I’ll walk you through each step like I’m right there in the kitchen with you. Just promise me one thing – don’t skip the natural release time. It makes all the difference.
- Prep your peas: First things first – give those black-eyed peas a good rinse in a colander. Pick through them to check for any little stones (trust me, it happens). No need to soak unless you want that extra-creamy texture (see my note below).
- Dump everything in: This is what I love about the Instant Pot – no fancy techniques needed. Just toss all your ingredients right into the pot. Peas, broth, veggies, spices – the whole gang. Give it one quick stir to mix everything up.
- Set it and forget it: Lock that lid on tight and make sure the valve is set to “Sealing.” Hit the “Manual” or “Pressure Cook” button and set it for 25 minutes on high pressure. Now walk away – seriously. The Instant Pot will do its thing while you put your feet up.
- Be patient with the pressure: When the timer goes off, don’t touch that valve. Let the pot sit for 10 minutes to do a natural release. This keeps your peas from turning to mush. After 10 minutes, you can carefully switch the valve to “Venting” to release any remaining pressure.
- Finish with love: Open that lid and inhale that amazing aroma. Fish out the bay leaf (unless you want to play “who gets the leaf” at dinner). Give it a taste and add more salt if needed. I usually add another pinch or two at this point.
- Serve it up: Ladle those creamy, dreamy peas into bowls while they’re piping hot. They’ll thicken up a bit as they cool, so don’t worry if they seem a little loose at first.
Soaking the Black-Eyed Peas (Optional)
If you want extra creamy peas, soak them overnight in cool water (they’ll plump up like little pillows). Just drain and rinse before cooking – easy.
Tips for Perfect Instant Pot Black-Eyed Peas
After making this recipe more times than I can count (and fielding all my cousin’s frantic “help, my peas won’t soften” texts), I’ve picked up some foolproof tricks. These little nuggets of wisdom will take your Hoppin’ John from “good” to “grandma-would-be-proud” status:
- Tomato tang twist: Stir in a can of diced tomatoes (juice and all) after cooking for a bright, acidic kick that cuts through the richness.
- Salt smartly: Always taste after cooking before adding more salt – those peas soak up seasoning differently than you’d expect.
- Spice it up: Throw in a pinch of cayenne or a diced jalapeño with the other veggies if you like some heat (my brother adds both – he’s wild like that).
- Smoky secret: A teaspoon of liquid smoke gives that slow-cooked flavor without the hours on the stove.
- Broth boost: Swap half the vegetable broth for beer (a lager works great) for extra depth – just don’t tell my teetotaler aunt.
- Greens goodness: Stir in a handful of chopped kale or collards right after cooking – the residual heat wilts them perfectly.
- Texture trick: If your peas are too firm after cooking, just lock the lid back on and pressure cook for another 3-5 minutes.
Remember – the best part about cooking is making it your own. Don’t be afraid to play around until you find your family’s perfect version.
Serving Suggestions for Hoppin’ John
Now that you’ve got this pot of golden goodness ready, let’s talk about how to serve it up right. I’ve had my fair share of Hoppin’ John meals (some hits, some…interesting experiments), and these are the pairings that always make everyone at my table go back for seconds:
- The classic way: Spoon it over a mound of steaming white rice – the grains soak up all that flavorful broth like little sponges of happiness.
- Greens for greens: My grandma always said you needed greens for wealth and peas for pennies, so I serve mine with garlicky collard greens or sautéed kale on the side.
- Cornbread crumbles: A big ol’ wedge of buttery cornbread isn’t just for mopping up juices (though it’s excellent at that) – crumbling some right into the bowl adds the perfect sweet contrast.
- Pickle punch: A side of tangy pickled okra or pepperoncini cuts through the richness beautifully – just like my aunt used to keep on her holiday table.
- Eggcellent twist: For breakfast leftovers (oh yes, we do breakfast), top with a fried egg and watch the yolk turn everything into silky perfection.
- Heat lovers: Pass a bottle of hot sauce at the table – Crystal or Tabasco are our family favorites for that vinegary kick.
If you’re feeling fancy (or just extra hungry), go all out with what I call the “Trifecta Plate” – peas on one third, rice in the middle, and greens on the remaining space with cornbread wedges tucked in the gaps. It’s a Southern symphony on a plate that’ll have everyone singing your praises.
Storing and Reheating Instant Pot Black-Eyed Peas
Here’s the beautiful thing about these black-eyed peas – they just get better as they sit. But you’ve got to store them right to keep that magic going. I learned this the hard way after a disastrous “I’ll just leave it in the pot overnight” incident (spoiler: it wasn’t pretty). Follow these simple steps and you’ll have delicious leftovers ready whenever the craving hits:
Refrigerating: Let the peas cool just until they’re not steaming hot (about 30 minutes), then transfer to airtight containers. I like to use glass jars so I can see the goodness inside. They’ll keep beautifully for up to 4 days in the fridge – if you can resist eating them all before then.
Freezing: These peas freeze like a dream. Portion them into freezer bags (I do 2-cup servings for easy meals) and squeeze out all the air. They’ll stay perfect for up to 3 months. Pro tip: lay the bags flat to freeze – they’ll stack like books in your freezer and thaw in no time.
Reheating: My favorite method is on the stovetop with a splash of broth or water to loosen things up. Just warm gently over medium-low heat, stirring occasionally – about 5-7 minutes should do it. If you’re in a hurry, the microwave works too (covered, with a damp paper towel on top), but stir every 30 seconds to prevent hot spots.
One last secret – if your peas thicken up too much in the fridge, don’t panic. Just stir in a little warm broth or water when reheating to bring them back to that perfect, silky consistency. I’ve served “second-day peas” to guests who swore they tasted better than the first batch.
Instant Pot Black-Eyed Peas (Hoppin’ John) Nutritional Information
Now, I’m no nutritionist (just a Southern cook who loves her peas), but I know y’all like to keep track of what you’re eating. Here’s the scoop on what’s in each comforting bowl of this Hoppin’ John. Just remember – these numbers can dance around a bit depending on your exact ingredients and how generous you are with those ladlefuls.
- Serving Size: 1 hearty cup (about 210g)
- Calories: 220
- Total Fat: 1g (that good plant-based kind)
- Saturated Fat: 0g
- Cholesterol: 0mg
- Sodium: 450mg (but you can adjust this to taste)
- Total Carbohydrates: 40g
- Dietary Fiber: 10g (that’s nearly half your daily needs)
- Sugars: 4g (all natural from those sweet veggies)
- Protein: 14g (who knew peas packed such a punch?)
Important Note: These nutritional values are estimates based on standard ingredients. Your exact numbers might vary depending on the brands of broth you use, how big your onion really was, or whether you snuck in those extra tomatoes like I sometimes do. The beauty of home cooking is that every pot is a little different – and that’s what makes it special.
FAQs About Instant Pot Black-Eyed Peas
After years of making this recipe for everyone from picky toddlers to my hard-to-please Uncle Joe, I’ve heard every question under the sun. Here are the answers to the ones that pop up most often – the kind of tips I wish I’d known when I first started cooking black-eyed peas in my Instant Pot:
Can I use canned black-eyed peas instead of dried?
You absolutely can, but it changes the whole game. If you’re in a pinch, drain and rinse 3 cans of black-eyed peas, then reduce the broth to 1 cup. Pressure cook for just 5 minutes – any longer and they’ll turn to mush. But between you and me? The dried peas give that perfect creamy texture that makes this Hoppin’ John so special.
How do I make my black-eyed peas spicier?
Oh honey, this is where the fun begins. For heat that builds, add a diced jalapeño with the other veggies (leave the seeds in if you’re brave). Want instant kick? Stir in 1/2 teaspoon of cayenne or red pepper flakes before cooking. My cousin swears by adding a chopped chipotle pepper in adobo sauce – just one will smoke up the whole pot in the best way.
Why are my peas still hard after cooking?
First – don’t panic. Older dried peas can take longer to soften. Just lock the lid back on and pressure cook for another 3-5 minutes. Next time, try soaking them overnight or adding 1/2 teaspoon of baking soda to the cooking water (an old Southern trick that speeds things up).
Can I make this with meat for New Year’s luck?
Absolutely, Toss in a ham hock or smoked turkey wing with the other ingredients – it’ll infuse the whole pot with rich flavor. Just fish it out before serving and shred any meat back into the peas. Vegetarian but want that smoky taste? A teaspoon of liquid smoke works magic without the meat.
Is there a way to make this recipe faster?
For a 15-minute express version, use an Instant Pot Quick Soak: Cover dried peas with water, pressure cook 2 minutes, then let sit 15 minutes before draining. Then proceed with the recipe as written – they’ll cook in about half the time. Just don’t tell my grandma I shared this shortcut.
Share Your Instant Pot Black-Eyed Peas Experience
Nothing makes me happier than hearing how y’all make this recipe your own. Whether it’s your great-aunt’s secret spice blend or your kid’s unexpected love for black-eyed peas (mine still won’t touch collards, but hey – baby steps), I want to hear about your kitchen adventures.
Snap a pic of your pot and tag me on Instagram – I love seeing those creamy peas piled high on rice or served up with your family’s favorite sides. Did you add extra garlic like my neighbor? Or maybe you threw in some okra like my cousin in Alabama? However you make it, share your version. Follow along for more inspiration.
And if you’ve got questions or “help, my peas won’t soften” moments, drop a comment below. I’ve been there (oh boy, have I been there), and I’m happy to troubleshoot together. After all, that’s how Southern cooking gets passed down – one shared tip and one messy kitchen at a time.