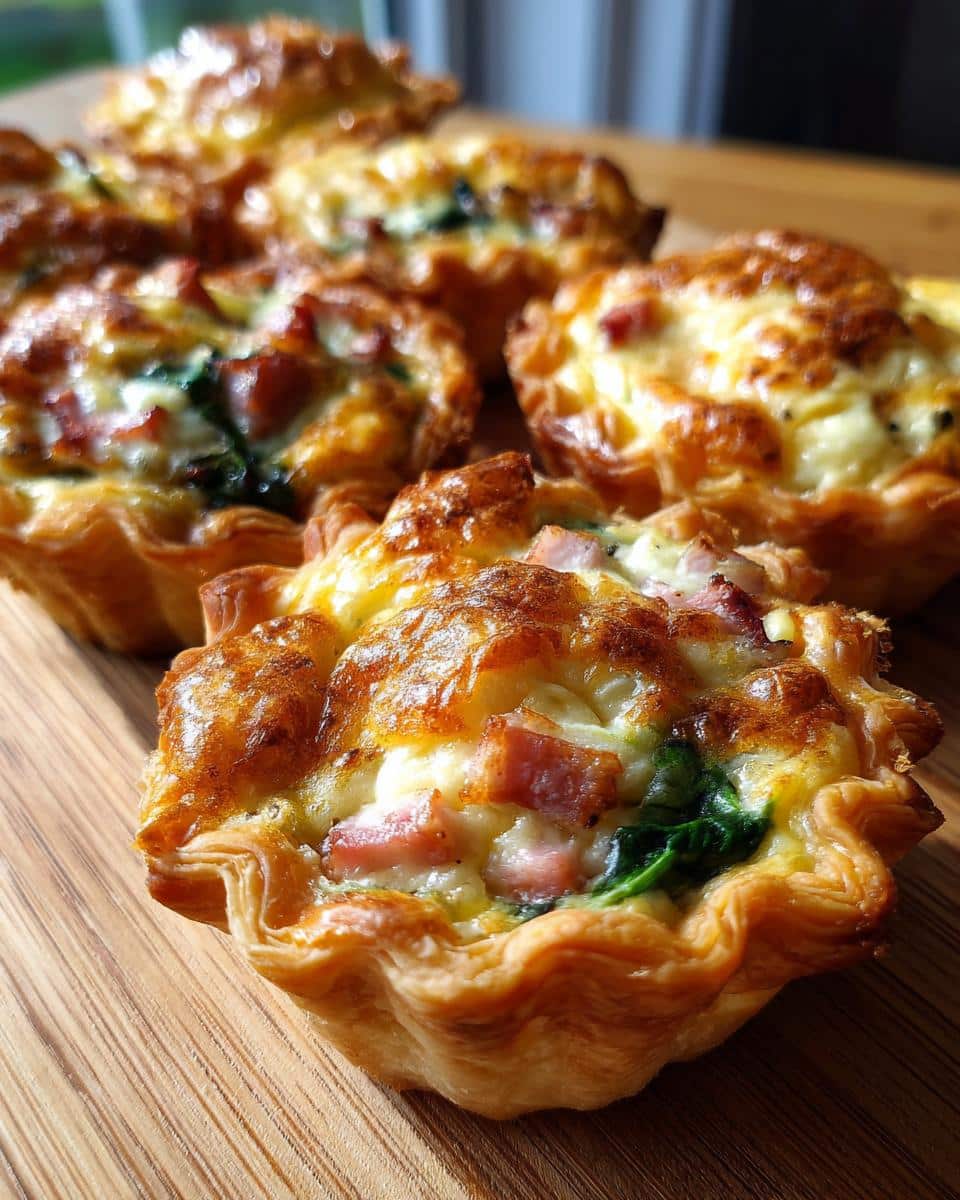
Oh, I am so excited to share this mini quiches recipe with you. Honestly, these little guys are my absolute secret weapon. They’re the first thing I make when friends pop over unexpectedly or when I need to bring something impressive but easy to a party. The best part is how incredibly versatile they are—perfect as a fancy appetizer, a light lunch with a simple salad, or even a quick breakfast on the run. Trust me, once you see how simple they are to whip up, you’ll be as obsessed as I am.
Table of Contents
Why You’ll Love This Mini Quiches Recipe
Oh, where do I even start with why these little bites are just the best? Let me count the ways:
- Lightning fast prep – Seriously, 15 minutes and you’re ready to bake. Perfect for when hunger strikes suddenly.
- Endless filling options – Swap in whatever’s in your fridge – mushrooms today, sun-dried tomatoes tomorrow.
- Crowd-pleasing magic – They disappear faster than you can say “Would you like another?” at parties.
- Freezer-friendly – Make a big batch and stash some for future you (future you will be so grateful).
- Perfect portion control – No messy slicing, just adorable single-serving cuteness.
Honestly, I make these at least twice a month – they’re that good and that easy.
Ingredients for Mini Quiches
Here’s everything you’ll need to make these irresistible mini quiches. I’ve learned through trial and error that using the right ingredients makes all the difference between good and oh-my-goodness amazing.
- 1 sheet puff pastry, thawed (don’t skip thawing – cold pastry cracks like crazy)
- 3 large eggs (room temperature blends better)
- 1/2 cup heavy cream (half-and-half works in a pinch)
- 1/2 cup shredded cheese (I’m partial to Gruyère, but cheddar works great)
- 1/4 cup diced ham (leftover holiday ham? Perfect)
- 1/4 cup chopped spinach, squeezed dry (wet greens make soggy quiches)
- 1/4 teaspoon salt (trust me, you’ll want this)
- 1/8 teaspoon black pepper (freshly cracked is best)
See? Simple ingredients you probably already have. The magic is in how we combine them.
Equipment You’ll Need
Don’t worry – you don’t need fancy gadgets for these mini quiches. Here’s my go-to lineup:
- Mini muffin tin (the star of the show – mine’s well-loved and slightly battered)
- Rolling pin (or an empty wine bottle in a pinch – I’ve been there)
- 2-inch round cutter (or a glass with about that diameter)
- Mixing bowl & whisk (any old set will do)
That’s it, Now let’s get those little quiches going.
How to Make Mini Quiches
Alright, let’s dive into the fun part – making these adorable little quiches. I promise it’s easier than you think, and the results will make you feel like a fancy French chef (without all the fuss). Here’s exactly how I do it:
Step 1: Prepare the Pastry
First things first – preheat that oven to 375°F (190°C). While it’s heating up, lightly flour your counter and roll out that puff pastry just enough to smooth any creases. Don’t go crazy rolling – we want those flaky layers to stay intact. Use your 2-inch cutter (or that trusty wine glass) to cut out circles. Gently press them into your greased mini muffin tin – they should come up the sides just a bit. Pro tip: If the dough gets too soft, pop it in the fridge for 5 minutes. Cold pastry is much easier to work with.
Step 2: Mix the Filling
Now for the magic mixture. In a medium bowl, whisk together the eggs and cream until they’re completely blended and slightly frothy. This is where I add my salt and pepper – taste it now because you can’t adjust later. The mixture should be smooth and uniform. Don’t overbeat it though – we’re not making meringue here. Just enough to combine everything nicely.
Step 3: Assemble and Bake
Time to bring it all together. First, divide your cheese among the pastry cups – about a teaspoon each. Then add your ham and spinach (or whatever fillings you’re using). Now carefully pour the egg mixture over the fillings, stopping just below the pastry rim. They’ll puff up while baking. Slide them into the oven and bake for 15-20 minutes. You’ll know they’re done when the edges are golden brown and the centers are just set – a little jiggle is okay, they’ll firm up as they cool. Let them rest for 5 minutes before popping them out – this patience prevents crumbling.
See? Simple as can be. In about 35 minutes total, you’ll have these gorgeous golden bites ready to impress. The hardest part is waiting for them to cool enough to eat.
Tips for Perfect Mini Quiches
After making hundreds (okay, maybe thousands) of these little guys, I’ve learned all the tricks for mini quiche perfection. First – don’t overfill. That egg mixture rises more than you’d think. Leave about 1/8 inch at the top. Second – check doneness with a toothpick like you would for cupcakes – it should come out clean but not bone dry. And my secret? A quick spritz of cooking spray on the muffin tin makes removal a breeze. Oh, And always let them cool for 5 minutes before serving – they firm up beautifully.
Ingredient Substitutions & Variations
One of my favorite things about mini quiches is how easily you can mix things up. If ham’s not your thing, crispy bacon bits or crumbled sausage work wonderfully. Vegetarian? Skip the meat and double up on veggies – sautéed mushrooms or roasted red peppers are divine. No Gruyère? Try sharp cheddar or even feta for a tangy twist. For dairy-free, I’ve had great results with almond milk and vegan cheese. The possibilities are endless – let your fridge be your guide.

Serving Suggestions for Mini Quiches
Oh, the ways you can serve these little beauties. My absolute favorite is arranging them on a pretty platter with small bowls of dipping sauces – honey mustard and spicy aioli are crowd-pleasers. For brunch, pair them with a simple green salad dressed in lemon vinaigrette. At parties, I love scattering them among grapes and cheese cubes for an instant charcuterie upgrade. And don’t even get me started on how perfect they are alongside tomato soup on chilly days – pure comfort.
Storage & Reheating Instructions
Here’s my tried-and-true method for keeping these mini quiches tasting fresh: Once cooled completely, store them in an airtight container in the fridge for up to 3 days. When you’re ready to enjoy them again, pop them in a 350°F (175°C) oven for 5-7 minutes – this brings back that wonderful crispness to the pastry. Microwaving works in a pinch, but trust me, the oven method keeps them from getting soggy. For longer storage, they freeze beautifully – just thaw overnight in the fridge before reheating.
FAQs:
Can I freeze mini quiches?
Absolutely, These freeze like a dream – just cool completely, then store in freezer bags with parchment between layers. When cravings hit, pop them straight into a 350°F oven for 10-12 minutes. They make the perfect fancy side dish ready in minutes.
Can I make these ahead for holidays?
You bet, They’re my go-to holiday potato recipe alternative when I want something lighter. Assemble them the day before, refrigerate unbaked, then just pop in the oven when guests arrive. The pastry stays crisp, and nobody will guess how easy they were.
Why did my quiches sink after baking?
Don’t worry – this happens if you open the oven door too early. The steam escapes and causes sinking. Wait until they’re fully golden before peeking. Also, make sure your egg mixture isn’t overbeaten – too much air makes them puff then collapse.
Can I use regular muffin tins?
Sure, They’ll just be bigger – adjust baking time to 20-25 minutes. I actually love making these in regular tins when I want an easy gratin alternative for brunch. Just watch the filling levels – regular tins need about 1/4 cup egg mixture per quiche.
Nutritional Information
Here’s the scoop on nutrition per serving (about 2 mini quiches): roughly 180 calories, 6g protein, and 12g carbs. But heads up – these numbers can change based on your exact ingredients. Using different cheeses or adding extra fillings will tweak the counts. The values are estimates to help you plan, not strict rules. After all, good food is about enjoyment first.
Share Your Mini Quiches
I’d absolutely love to see your creations. Snap a photo of your mini quiches and tag me – nothing makes me happier than seeing these little bites brighten someone else’s table.
These Mini Quiches are the perfect bite-sized appetizer or breakfast—endlessly customizable, easy to make, and always a crowd-pleaser. If you love make-ahead breakfasts, you’ll also enjoy our Sausage and Egg Breakfast Rolls or our elegant Mini Spinach and Feta Quiche Appetizers. Tag us on Facebook to show off your beautiful quiches Find more easy breakfast ideas in our breakfast recipes collection. Print15-Minute Mini Quiches Recipe: Irresistible Party Bites
Mini quiches are perfect bite-sized treats for any occasion. They make a great appetizer or light meal.
- Prep Time: 15 minutes
- Cook Time: 20 minutes
- Total Time: 35 minutes
- Yield: 24 mini quiches
- Category: Appetizer
- Method: Baking
- Cuisine: French
- Diet: Low Lactose
Ingredients
- 1 sheet puff pastry, thawed
- 3 large eggs
- 1/2 cup heavy cream
- 1/2 cup shredded cheese
- 1/4 cup diced ham
- 1/4 cup chopped spinach
- 1/4 teaspoon salt
- 1/8 teaspoon black pepper
Instructions
- Preheat oven to 375°F (190°C).
- Roll out puff pastry and cut into circles to fit mini muffin tins.
- Press pastry circles into greased mini muffin tins.
- Whisk eggs, cream, salt, and pepper together.
- Divide cheese, ham, and spinach among pastry cups.
- Pour egg mixture over fillings in each cup.
- Bake for 15-20 minutes until golden and set.
- Let cool 5 minutes before serving.
Notes
- You can substitute fillings with your favorite ingredients.
- Store leftovers in refrigerator for up to 3 days.
- Reheat in oven for best texture.


